Translate

Showing posts with label flower. Show all posts

Saturday, January 18, 2014

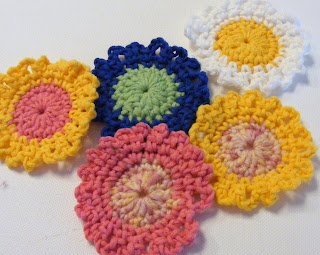
Crochet Colorful Flower


Crocheted Flowers are a great way to use up little bits of leftover yarn. They have lots of potential uses as an embellishment.  They look great on shirts, bags or hair bows. Or, add a stem and make a bouquet!
  1. With center color, Start with a magic ring.
  2. Chain 2, make 16 HDC (half double crochets) into the ring and join.
  3. Chain 1, make 1 SC (single crochet) in each HDC from previous round.  Join.
  4. Finish off center color, add in Outer color.
  5. Chain 1, make 1 SC in each SC from previous round. Join.
  6. *Chain 4, 1SC in next stitch*  Repeat all the way around.  Join and finish.

Crochet Flower Handle Basket


This basket stands about 3 1/2 inches high, handle and all, and the basket part is about 1 3/4 inches tall.
To stiffen basket, dip with water made in the proportion of 1 spoonful of sugar to 2 spoonfuls of water and pull into shape over a form; a glass of anything the desired size will do.
STEP-BY-STEP INSTRUCTIONS
Chain 2.
1st Row - Make 6 sc in 1st ch.
2nd Row - Working round and round using both loops at top of stitch, make 1 sc in 1st sc, * 2 sc in next sc, 1 sc in next sc. Repeat from * around row.
3rd Row - Make 2 sc in every 3rd stitch.
4th Row - Make 2 sc in every 4th stitch.
Continue this way making 1 sc more between the widenings in each successive row until bottom of basket measures 1 3/8 inches or is size desired.
Next Row - Ch 4, 1 dc in last sc, * skip 1 sc, make a group of (1dc, ch 1, 1 dc) in next sc. Repeat from * around row, join in 3rd ch.
Next Row - Ch 4, 1 dc in 1st space, * make a group in next group. Repeat from * around row, join in 3rd ch.
Repeat this row 7 times (or until basket is as deep as desired) making 2 ch in groups in last row, join.
Finish edge by making 1 sc and 5 dc in each group.
In the last row of bottom of basket, in each sc which was skipped make 3 dc, join.
Using both loops at top of stitch, make 1 sc in each dc, join.
To make the handle fasten thread between 2 shells on edge, ch 3, 2 dc in same place, * ch 3, turn, 2 dc around 3 ch of preceding row. Repeat from * until handle is length desired, fasten it to opposite side of basket.
Embroider a flower on each side of basket just below handle.
Sunday, January 5, 2014

Making a Tulle Hair Bow Tutorial


I’ve been working on different ribbon techniques lately, and realized that some of the same techniques that can be done with ribbon can also be completed with tulle, for a totally different kind of look! This is a very simple hand-sewing project that’s suitable for beginners.
Supplies (photo below):
* Two (2) or three (3) different colors of 6-inch-wide (15.2 cm) tulle. This can be purchased online or at most big-box craft stores, usually in the wedding section.
* Two (2) colors of Perle cotton thread to match your tulle, size 8
* A large darning needle
* A scrap of felt (I would NOT recommend 100% wool for this project), or buckram
* A 1 1/2 – 2″ (3.8 – 5 cm) circle “template” to trace. I traced a baby jar lid and then trimmed the felt a little smaller after cutting.
* Scissors
* A pinch clip for holding your project as you work – and for use at the end to mount to your carnation bow
* Hot glue gun and glue
* A bit of 3/8″ ribbon if you would like to line your clip
Instructions
1. Cut two (2) of your colors of tulle to 30 in. (76 cm) for the base.
2. Cut one (1) of your colors of tulle to 20 in. (51 cm) for the top.
3. Layer the two long pieces on top of each other. You can also use just one piece of tulle if you prefer, but two adds a bit of “body” to your bottom layer.
4. Fold the pieces in half, width-wise (below).
5. Fold in half again (below).

6. Clip together with a pinch clip (below). Because tulle is slippery, you’ll need to adjust your folds and move your clip as you sew. Taking just a little time to do this will make for a much neater bow.

7. Thread your needle with matching thread, and tie a large knot at the end so it doesn’t slip through the tulle. Sew about 1/4 in. (0.6 cm) from the folded edge of the tulle, and complete a running stitch all the way to the other end (below).
8. Gather the tulle and form into a circle. Stitch both ends together, taking care that you don’t accidentally twist your work (below).

9. Cut out circle of felt or buckram (below). A circle with a diameter of about 1 1/2 in. (3.8 cm) is a good size.
10. Carefully stitch your circle of tulle to the felt or buckram (below). Make sure you catch all the folds. I whipstitched the back as well as completed a running stitch. Depending on how tight you gathered your tulle, you might see a “hole” in the middle front where you can still see the felt/buckram, but don’t worry – our tulle center will cover this.
11. Complete steps 4 through 8 with the smaller piece of tulle (below).
12. Sew this piece of tulle to the center of your project (below).
13. Hot-glue and sew a pinch clip (or barrette if you choose) to the back of the project, and have your little one wear your creation with pride!

Saturday, January 4, 2014

Puffy Daisy Flower Crochet Pattern

Puffy Daisy Flower Crochet Pattern is easy for beginners and fun to make. You can make the Puffy Daisy Flower in one color or in two different colors for the center and the petals . Approximate size of the ready flower is 2 inches (5.1 cm) in diameter.
Recommended yarn: medium weight or worsted weight (weight category #4). I used Red Heart Super Saver.
Recommended crochet hook: I9/5.5 mm or J10/6.00 mm
Stitches and abbreviations used: CH - chain, SC - single crochet, DC - double crochet, slip stitch.
The Center of the Puff Daisy Flower
Step 1. CH 3 (make a chain of 3 stitches)
Step 2. Join the ends of the chain in a ring with a slip stitch
Step 3. SC 6 in the ring (make 6 single stitches in the ring)

The Petals of the Puff Daisy Crochet Flower:
If you make 6 SC for the center of the Puffy Daisy Flower, you will have 6 petals. If you want 5 petals or 7 petals, you need to make 5 or 7 stitches for the center of the daisy flower accordingly.
The first petal: Attach the different color yarn to the center of the flower if you are making a two-color Daisy Flower otherwise continue with the same yarn:
Step 1. CH 3 (make a chain of 3 stitches)

Step 2. Make a DC (double crochet stitch) in the same stitch, do not finish the double crochet (draw the yarn through 2 loops only once and leave 2 loops on your hook).
Step 3. Make a TC (treble crochet) in the same stitch and do not finish it: draw the yarn through 2 loops only twice, you will have 3 loops on the hook)
Step 4. Make a DC (double crochet) in the same stitch and do not finish it: draw the yarn through 2 loops one time. You have 4 loops on your hook now. 
Step 5. Yarn over the hook and draw the yarn through all 4 loops on your hook finishing all 3 stitches (DC, TC and DC) at once.
Step 6. Make a slip stitch in the next stitch of the center of the flower finishing the first petal. 
Repeat Steps 1 to 6 for other petals and the flower is ready. The flower is puffy because in each petal the TC stitch between two DCs pops out (the TC stitch is higher then DC).
The Puffy Daisy Flower is ready! :)

Saturday, October 5, 2013

ribbon ruffle flower

Materials:
36″ of 5/8″ wide ribbon
Needle
Coordinating embroidery floss (1 strand) or any heavy thread that will not break when pulling to ruche ribbon
*Note:  I used black embroidery floss in the pictures below so it would stand out.
Directions:
Ruched Flower (Step 1)1.  Mark the wrong side of your ribbon, moving from right to left.  Along the bottom edge, mark every inch.  Along the top, first mark 1/2″ in, then mark every inch the rest of the way across.  If you’ve done this correctly, your marks should be evenly staggered the entire length of your ribbon, as shown in the picture provided.
Ruched Flower (Step 2b)2.  With a long piece of thread (approximately 36″), hand baste from mark to mark, creating a zigzag pattern, stopping occasionally to gather (“ruche”) the ribbon.  Stopping every eight to ten inches to gather your ribbon is recommended.  Any longer and you risk breaking your thread.  Also, put a hefty knot at the start of your thread so that as you pull to gather it doesn’t pull through your ribbon.
Ruched Flower (Step 2a)*The trick to the hand basting is to be consistent in your stitches.  If you look at the picture provided, I always do three stitches along each diagonal, and I was always sure to start by inserting the needle from underneath the ribbon and to end with the needle coming out the top.  I found this method made it easiest to gather the ribbon.
3.  Adjust your gathers so that your finished piece of ribbon is now ruched to about 17″.  Leave the long tail of thread in case any adjustments need to be made while assembling your flower.
Ruched Flower (Step 4)
4.  With a new piece of thread, baste across (from side to side) the first six “petals” of your flower.  Again, put a hefty knot at the start of your thread so you don’t pull it through when gathering. 
Ruched Flower (Step 5)
5.  Pull the thread tight to form a circle of petals.  Knot the thread, but do not cut it, to hold the center loop of petals in place.
6.  Move gathered tail from the front of the flower to the back.  Use the before and after pictures provided below as a reference.
Ruched Flower (Step 5)Ruched Flower (Step 6)
7.  Insert needle through the center of the flower to move the working thread from the front to the back.
Ruched Flower (Step 7a)Ruched Flower (Step 7b)
8.  Spiral your gathered tail around and around, creating the layers of your flower.  Tack the flower together to keep the tail in place by coming up in the crease of each petal and back down in the same crease, being sure to catch the layer underneath.  The folds, or creases, in your petals will hide your stitches.
Ruched Flower (Step 8a)Ruched Flower (Step 8b)
Ruched Flower (Step 9)9.  Continue until you have tacked the entire tail in place.  Take a few extra stitches on the back of your flower to hold your ribbon end in place.  Knot and cut the working thread.
Ruched Flower (Step 10)10.  Knot and cut the gathering thread.
11.  Embellish center with a button!