1. SELECT YOUR RIBBONS: You will need 3 or 4 coordinating ribbons of varying widths ranging from 1" to 1/8". You will also need a cute button and a needle (with a small eye) and thread.
2. CUT RIBBONS TO SIZE: In this example, I cut the back layer of ribbon (the solid green) into 4 strips of 4" lengths.
The middle layer (the pink gingham) was cut into 4 strips of 6" lengths.
The top layer (the green gauze) was cut into 3 strips of 4" lengths.
 3. ALIGN BACK LAYER: Lay out ribbon in formation shown, then carefully pick up and stitch through all layers repeatedly to anchor position of all ribbons. Just make about 4 or 5 stitches at this point, they'll be anchored further with each additional layer. Make sure that the last time the needle goes up through the ribbons, it passes through the center of the formation so the next layer will be centered as well.
 4. CREATE AND ATTACH LOOPS: Take one of the 6" strips, form a loop and center the bottom of the loop on the underside, with edges overlapping about 1/4" to 1/2". Send needle up through the bottom of the loop, trying to get as closely centered both lengthwise and width wise as you can.
 Pull first loop down the thread to rest on top of the bottom ribbons, then repeat process for remaining 3 loops. When all are threaded onto bow, arrange so they are evenly spaced and create a nice circular arrangement.
When loops have been arranged, send the needle up and down through all layers to anchor ribbons, like so:


As before, make sure that the last pass of the needle up through the ribbons is coming up through the center of the arrangement.
6. SEW BUTTON ON: Place button on top layer of ribbons in desired location and sew in place, through all layers of ribbon. Do this at least 4 or 5 times, so there is plenty of thread holding your button and ribbons in place.
Your bow will now look like this:
7. FINISH EDGES OF BACK LAYER: First, take scissors and blunt-cut edges of back layer so they are all peeking out from the bow in uniform distances.
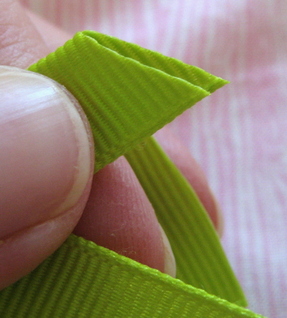
Then, carefully fold the end of each ribbon in half and snip off the end at a diagonal, with the edges of the ribbon being longer than the center. Don't cut the edges of the ribbon very much (remember, you just evened them all out), just cut the middle of the ribbon out at an angle. Clear as mud? Hopefully the photo will explain things
8. APPLY STOP-FRAY: Immediately after the raw edges are cut, apply a little bit of a stop-fray product such as the Fray Check you see here to every exposed cut edge so your ribbon edges stay crisp. It will usually dry clear, but occasionally the Fray Check will be annoyingly obvious even when dry. This is especially true with gauze-like ribbons, which is why I don't have any exposed cut edges of the top ribbon layer. If in doubt, try it on a scrap piece before
constructing your bow.
9. SEW BARRETTE CLIP IN PLACE: Take a plain metal barrette (you can buy a whole package of them at Walmart in the sewing section), position on back of bow, and stitch in place on both ends. Take care not to let your stitches show from the top of the barrette, but try to include the underside of some of the loops from the middle layer for increased stability.
There you have it! Your bow can now grace the hair of some lucky little girl, or you can attach it to a headband or hat.


 Pull first loop down the thread to rest on top of the bottom ribbons, then repeat process for remaining 3 loops. When all are threaded onto bow, arrange so they are evenly spaced and create a nice circular arrangement.


