Translate

Thursday, November 28, 2013

A Simple Clutch – Ruffles Version!!


If you’ve missed the previous posts this week – we are taking a Simple Clutch design and changing it up with different styles! The first tutorial includes all the instructions to make the clutch, including how to do a fun patterned Applique on the front section. The second tutorial is a Vintage design and has instructions on how to change up the front piece with vintage lace and some fun flowers.
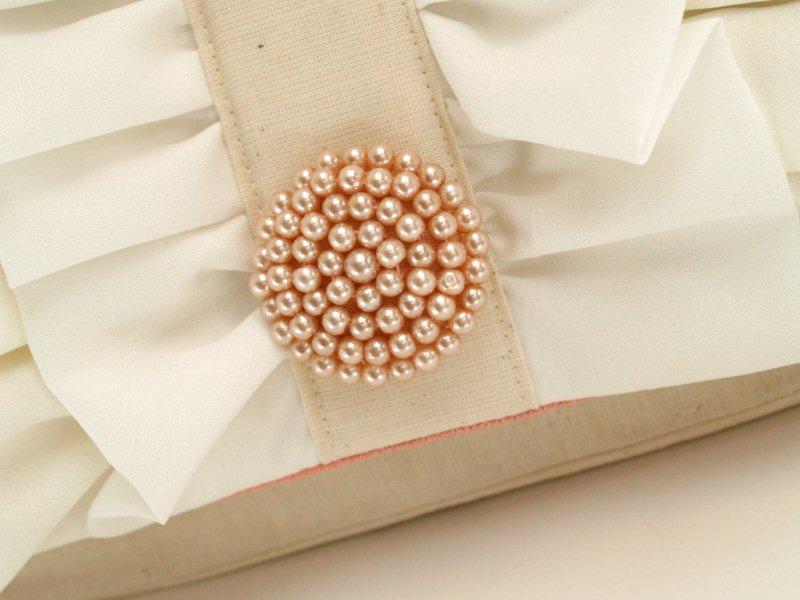
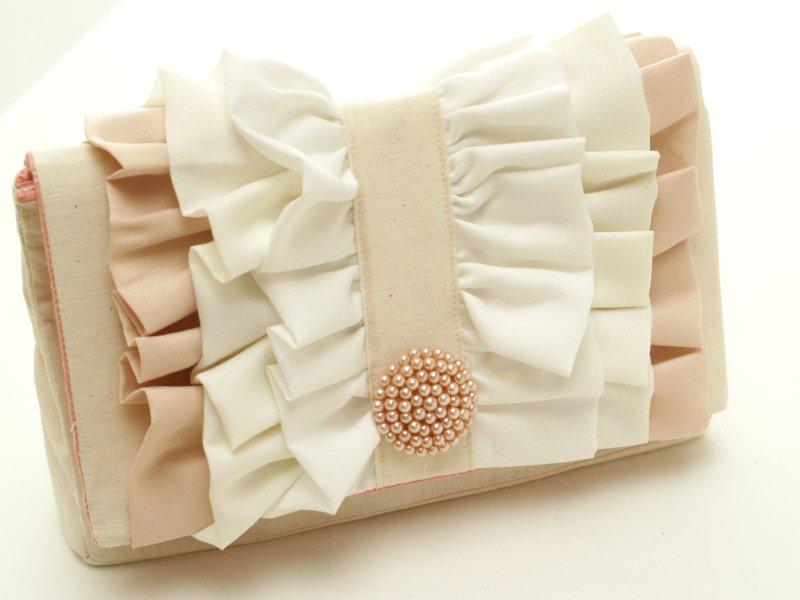
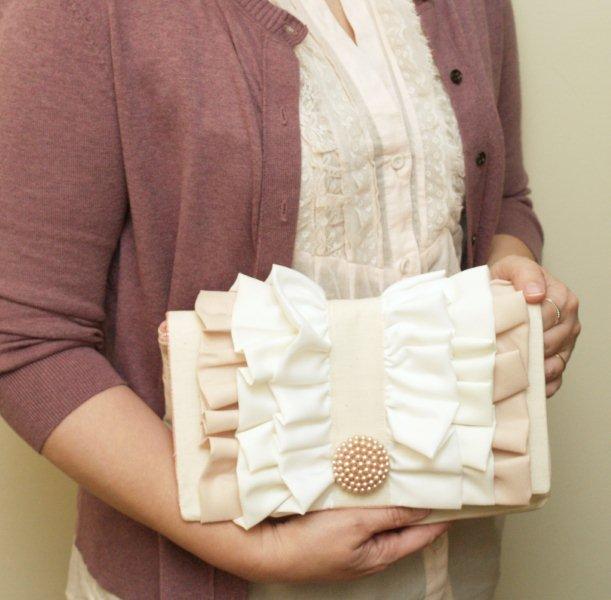
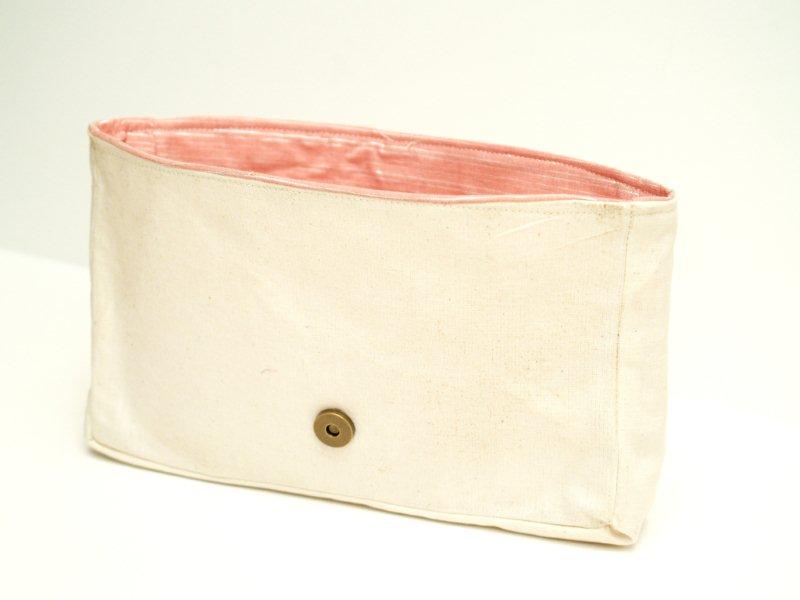
Today we’re adding some ruffles and a pretty pearl decoration. The ruffles darken to a pale pink/champagne color and the inside of the bag is pink with a sparkly silver thread running through it!
Here’s what you’ll need to make this Version:
All the fabric/interfacing/notions requirements for the Original Clutch – along with:
1/4″ yard of three fabrics for ruffles – if you want three different shades of ruffles.
Decorative button or pin
Follow the instructions for the original clutch to make the base section of your clutch.
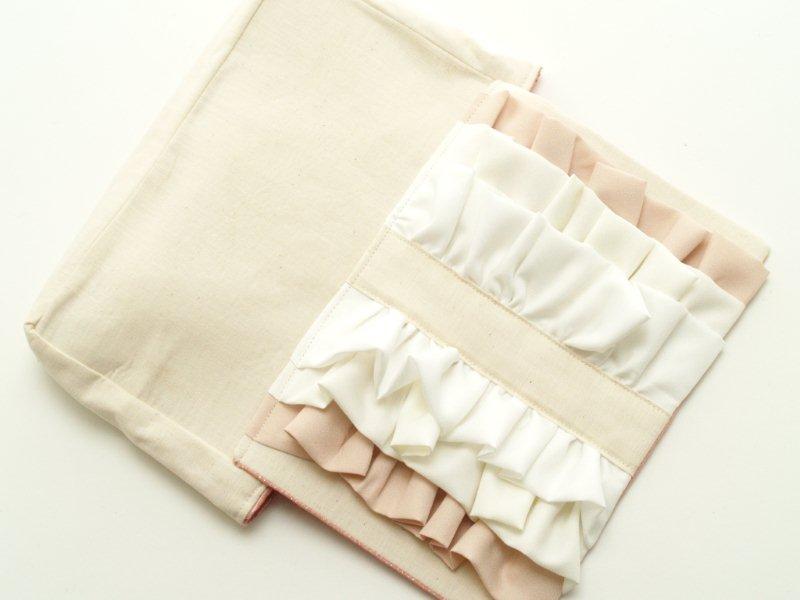
Before you iron on the heavy duty stabilizer onto your front piece, you are going to create all your ruffles.
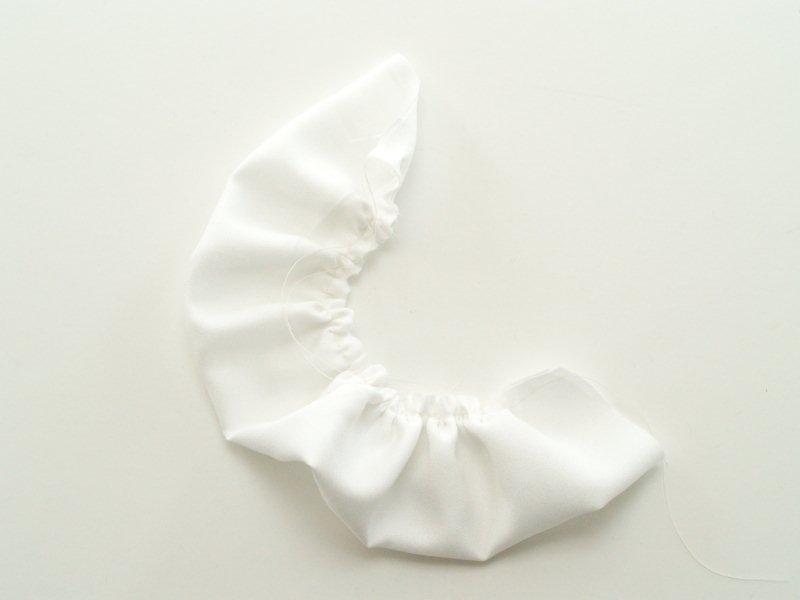
Cut from each fabric 2 – 5″ x 16″ pieces. Fold each piece in half – long ways – and sew a gathering stitch down the raw edges.
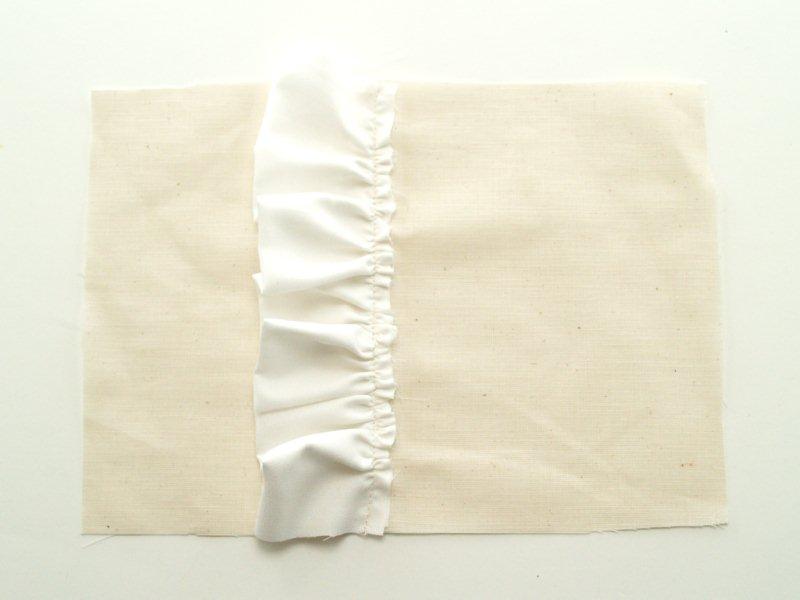
Mark the center of your front piece. I folded mine in half and used my finger to press a crease into the fabric.
Place the raw edges of your lightest color ruffle 1/4″ to the left of the center crease.
Sew in place with a 1/4″ seam allowance.
Fold over the first ruffle and pin the second ruffle 5/8″ from the seam. Sew your next lightest ruffle to the left of this ruffle.
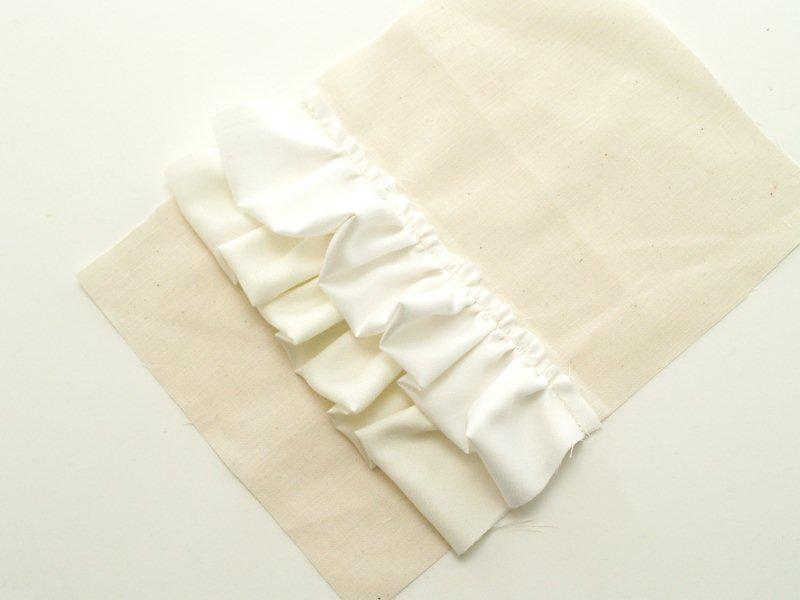
Sew on the last ruffle to the left of the second one, again 5/8″ from the seam of the second ruffle.
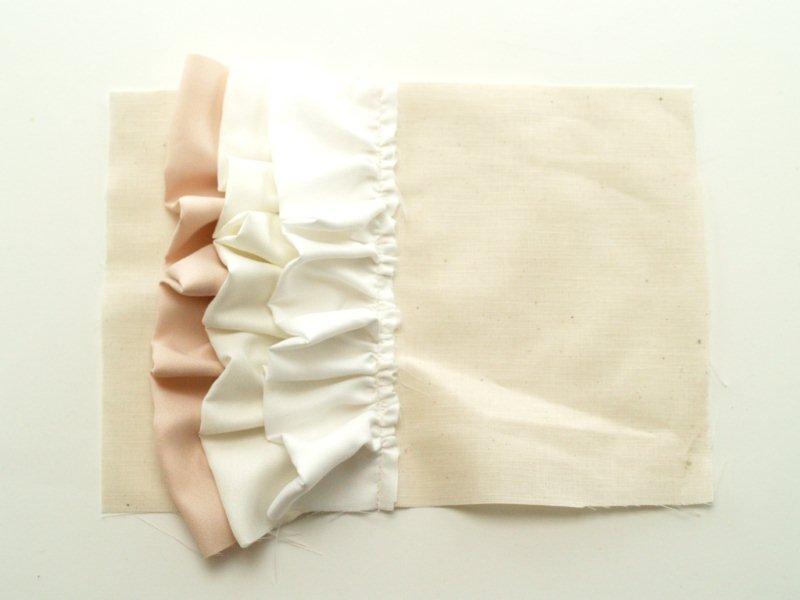
Sew the three ruffles to the right of the crease just like you did the first set.
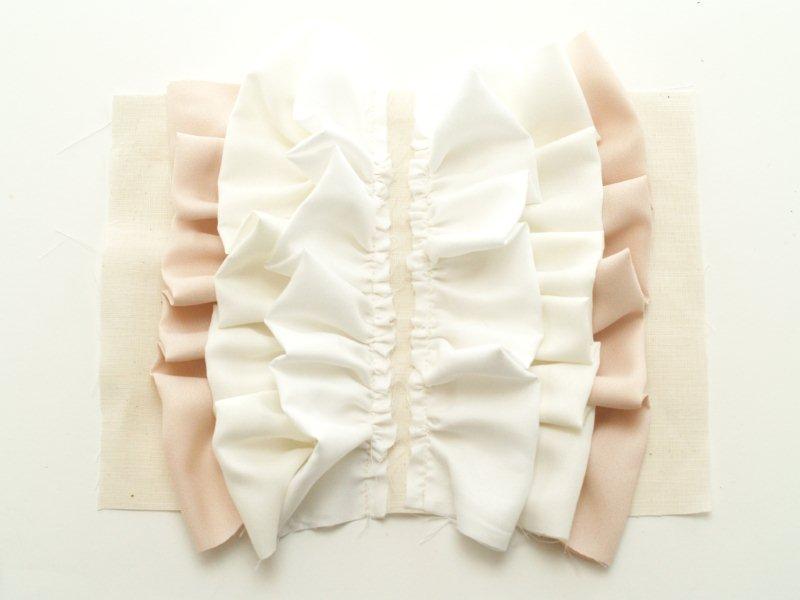
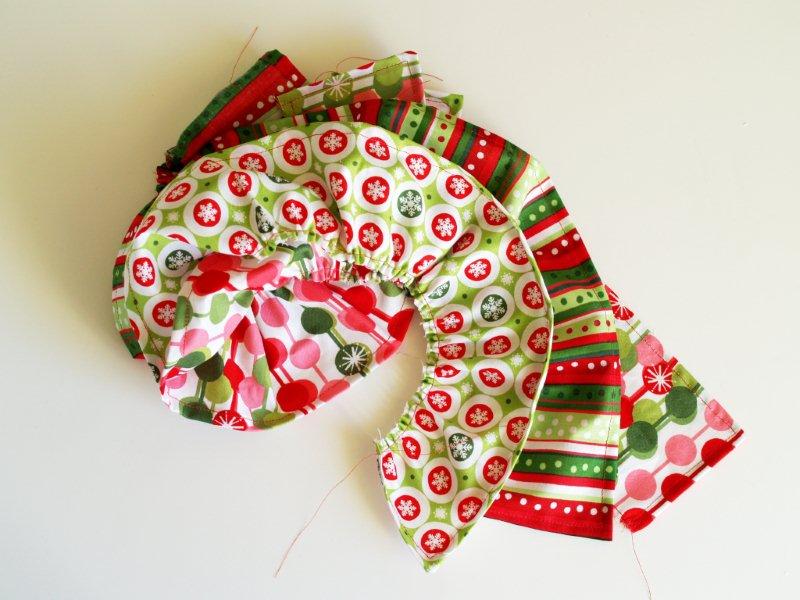
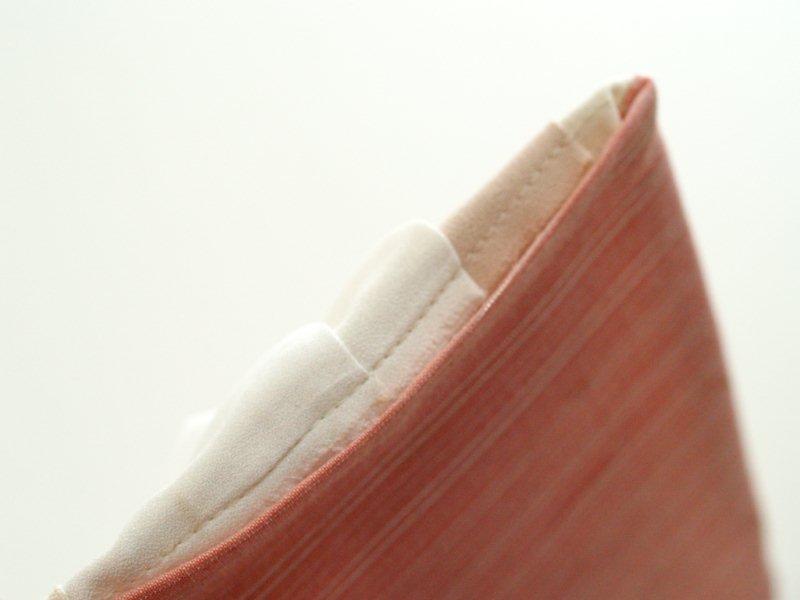
Awww. Cute ruffles. But a little wily.
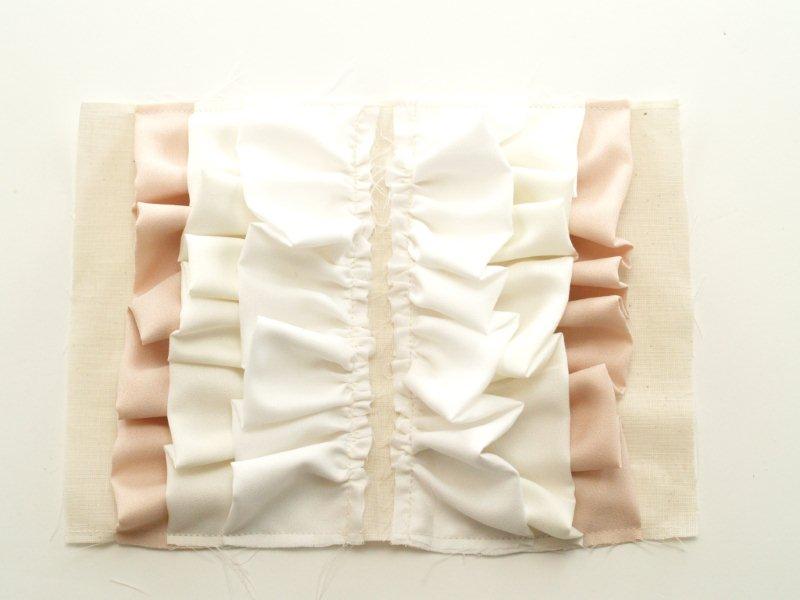
Baste down the top and bottom of the ruffles with a 1/4″ seam.
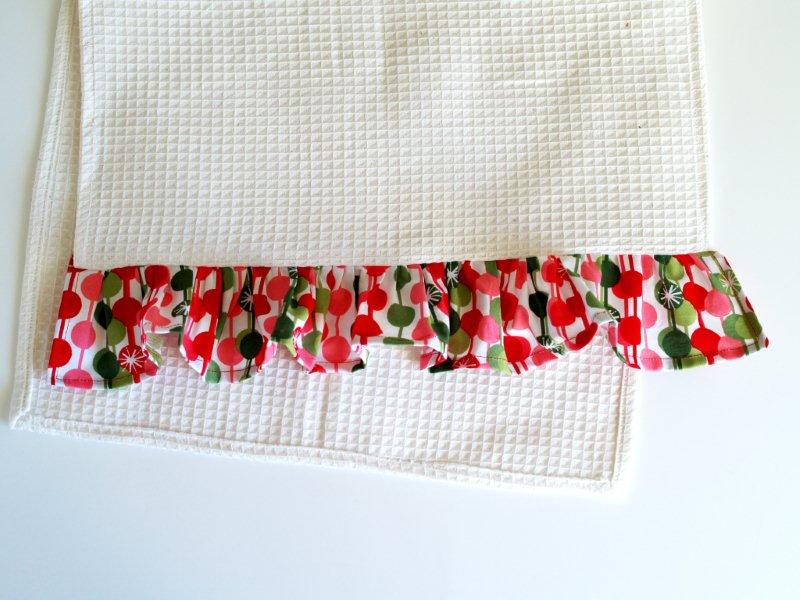
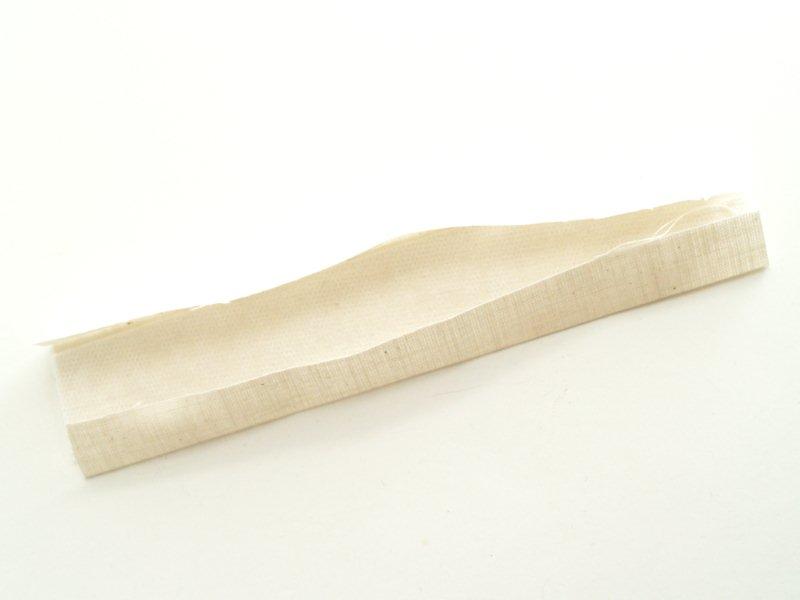
From the same fabric as the outside of your clutch, cut a rectangle 4″ x 8″. Cut a piece of fusible interfacing 1 1/2″ x 8″. Iron the interfacing down the center of the rectangle.
Fold the two sides to the back over the interfacing and press.
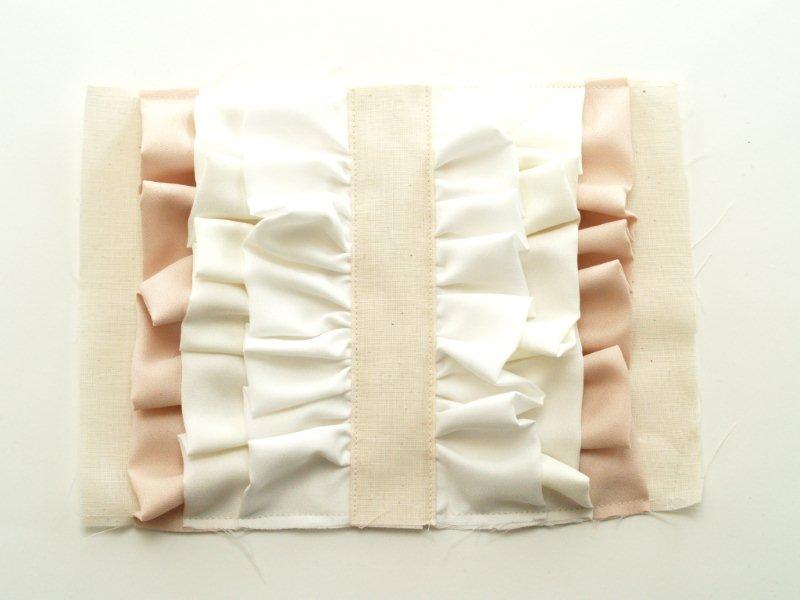
Place the rectangle over the ruffles at the center of the front piece. Sew the piece on with a straight stitch just inside the fold on each side.
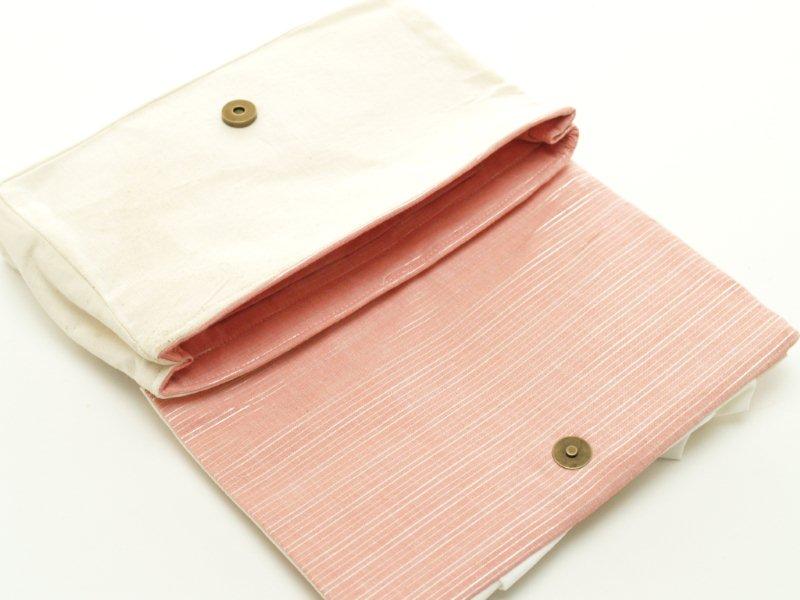
Place your front and lining pieces right sides together and sew around the sides and bottom, leaving the top open for turning.
Make sure you add your inside snap piece to the lining.
Turn right side out and press. Press the seam allowances at the top under as well.
Sew the front flap piece to the back top of the clutch. Remember to check your placement by snapping the pieces together first. It should overlap onto the back piece about 1″.
Fold in the top center sections on each side and tack in place to make the little top side pleats.
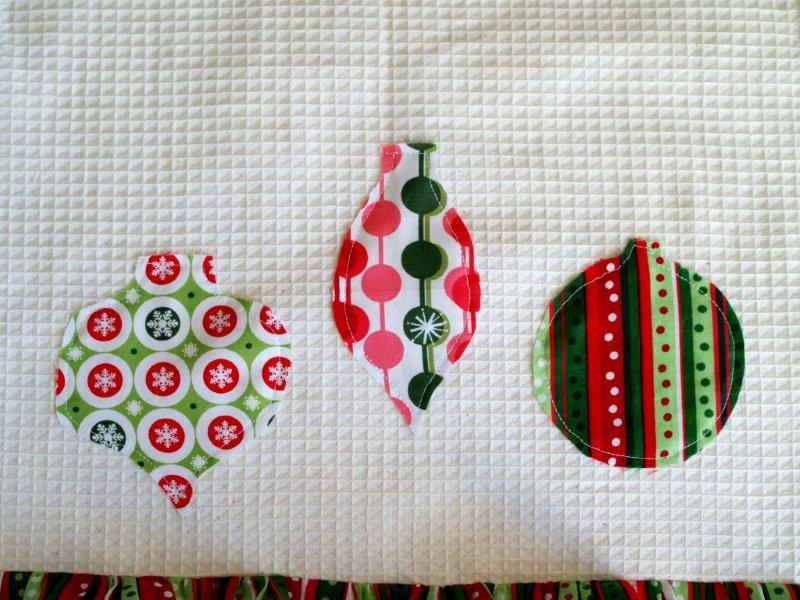
Add a decorative piece to the front – and you’re all done!

Colorful Retro Christmas Dishtowels

They are decorated with fun retro fabrics and ruffles and ric rac. I just love them!
I think they would be great for hostess gifts, or to take to a teacher or neighbor with a plate of cookies!
Ready to make a set? Here’s what you’ll need.
  • Waffle weave fabric: 17″ X 28″ for each dishtowel (or you can use a purchased dishtowel)
  • Fabric for ruffles and applique:
    For each ruffle you need a rectangle 4″ x 36″
    Small pieces of each fabric for the ornaments and tree .
    Small pieces of black fabric for the ornament toppers, the tree trunk and the presents.
  • Variety of Ric Rac
  • Patterns – Click Here to Download
Begin by cutting out all your fabric pieces.
For each ruffle, hem the two short sides and one long side. On the other long side, sew a ruffle stitch.
Hem three sides of your dishtowel fabric as well, leaving one short side unhemmed.
Pin the bottom ruffle to the unhemmed side of your dishtowel, right sides together. Sew the ruffle in place and press down.
Pin the second ruffle one inch above the seam of the first ruffle. Right sides should be together and the raw edge should be pointing to the bottom. Sew this ruffle on and press down.
Repeat for the third ruffle.
Let’s do the ornament applique first. :)
Lay out your ornament pieces where you want them. You can use heat-n-bond or something similar to iron them on, or you can just pin them on and sew. Whatever you are more comfortable with.
Sew the ornament pieces on.
Sew strips of ric rac from the top of the dishtowel to each ornament. (You can use ribbon too if you want – though it’s not near as squiggly. :)
Make sure with each piece of ric rac that you very slightly burn the edges so they don’t fray.
 Sew on your ornament toppers next.
Finish off this one with cute ric rac bows at the top of each ornament.
For the Christmas Tree towel, you will do the same thing. After you sew on the ruffles, sew on your applique pieces.
Fray check all your raw edges so the appliques don’t fray when you wash them. If you don’t like the raw edges, there are a couple things you can do. You can sew all the pieces on with a satin stitch ( a very tight zigzag stitch that covers all the raw edges). Or you can add a seam allowance to the pieces and cut out two of everything. Sew the pieces together and turn right side out, then sew them on.
Add in ric rac embellishments and bows on the packages, and a bow at the top of the tree.
Sit back and admire your Christmas Ric Rac Ruffliness.
These appliques would also look great on onesies or t-shirts! Feel free to go crazy with them!  (And send me pictures of course. :)

How to Crochet a Cable Stitch

This is a great crochet tutorial for you to follow. Learn how to make a cable stitch in only eight steps. Four stitches are needed for the cable stitch.

  1. In order to make a crocheted cable you will need 4 stitches. Therefore chain in multiples of 4, plus add 3. For example, 4 cables would be 16 stitches, plus 3, equals 19, therefore chain 19 stitches. Single crochet in the 2nd stitch from the hook, and in each stitch of the chain.


  2. Chain 3 and turn.


  3. Skip the next stitch, double crochet in each of the next 3 stitches.


  4. Insert the hook, from front to back, into the first stitch skipped.


  5. Draw up a loop, loosely, bring it to the top of the last double crochet worked, and finish the double crochet with yarn over, and through the loops.


  6. Repeat steps 3, 4, and 5 across the row. End the row with a double crochet in the last stitch.
     
  7. Chain 1 and turn, single crochet in each stitch across the row.


  8. Repeat the steps, starting at step 2.
     
  9. Photo shows 3 rows of cable stitch completed.


Read more at http://www.allfreecrochet.com/Tutorials/How-to-Crochet-a-Cable-Stitch/ct/1#TBf5qq09zUDDRR4v.99

Double Strand Infinity Scarf


You’ll need:
M size (9.0 mm) crochet hook
2 balls of worsted weight yarn.
Yarn needle
Abbreviations, in US terms:
ch = chain
sl st = slip stitch
dc = double crochet
st(s) = stitch(es)
V-stitch = Work 1 dc, 1 ch, 1 dc into the same stitch.
Foundation: Ch 99 with 2 strands of yarn held together.  Join with a sl st in the back ridge of first chain.  This means you will twist the chain slightly in order to work into the back ridge or hump of the chain.
Round 1: Ch 1.  Work 1 sc into each st around.  Join to ch-1 with a sl st.
Round 2:  Ch 3.  Work 1 dc into same st  as join.  *Skip 2 st.  Work (dc, ch 1, dc) in next st.  This is one V-stitch made.  Repeat from * around.  Skip 2 st.  Join with a sl st into 2nd chain of round. – 99 sts
At this point, count your stitches and make sure you still have the same number you started with.
Round 3:  Ch 3. Work 1 dc into next ch-1 sp.  *Skip 2 st.  Work (dc, ch 1, dc) in next ch-1 sp.  Repeat from * around. Skip 1 st, then join with a sl st into 2nd chain of round. – 99 sts
Round 4:  Repeat Round 3.
Round 5:  Repeat Round 3.
Round 6:  Repeat Round 3.
Round 7:  Repeat Round 3.
Round 8:  Ch 1 (does not count as st).  Work 1 sc into each st around.  Join with a sl st.
Fasten off and weave in ends.

Scalloped Headband


You'll need yarn in the color of your choice, a size G hook, and a hair elastic.

Abbreviations are as follows:

ch = chain
sc = single crochet
sl st = slip stitch
sk = skip

First attach your hair elastic like this:


Now ch 48 more.

Then attach your foundation chain to the hair elastic again like this:

Turn. *Skip 1 ch, sc 6 times in next ch, skip 1 ch, sl st in next ch*. Repeat from * to * to end.

 Sl st in final ch. Finish off. Weave in ends.

Voila!

KNITTING YO YO TOTE

Finished Measurements

Approximately 12½ wide x 8” high x 5” deep (Not including handles)

Materials

3 Hanks Berroco Weekend (100 grs), #5946 Phlox
Straight knitting needles, size 7 (4.50 mm) OR SIZE TO OBTAIN GAUGE
1 Set (4) double pointed knitting needles (dpn), size 6 (4.00 mm)
1 St marker
Tapestry needle
1 Pair 12” sewn round rein handles #RR12 from Homestead Heirlooms
One 8” dowel and finial set from Homestead Heirlooms

Gauge

18 sts = 4”;  26 rows = 4” in St st on larger needles
TO SAVE TIME, TAKE TIME TO CHECK GAUGE

Note

Lining and outer sections of bag are worked all in one piece, starting and ending at center bottom seam of lining.

Open Circle

Row 1 (RS):  K to marker, join another hank of yarn and bind off center 9 sts, k to end.  Working both sides at once, bind off 3 sts at each circle edge 3 times.  Work 3 rows even.  Cast on 3 sts at each circle edge 3 times, end on RS.
Next Row (WS):  Purl, cast on 9 sts over sts bound off on Row 1.

Bag

Front Lining:  With straight needles, cast on 57 sts.  Work even in St st for 2½”, end on WS.  Purl 2 rows (Garter ridge).  Cast on 11 sts at beg of the next 2 rows – 79 sts.  Work even in St st for 2 rows.
* Dec Row (RS):  K1, k2 tog, k to last 3 sts, SSK, k1 – 77 sts.  Purl 1 row, knit 1 row, purl 1 row.  Rep Dec Row once more.  Purl 1 row. * Rep between *’s twice more, end on WS – 67 sts.  Rep Dec Row every RS row 5 times more 57 sts.  Work even until piece measures 9½” from beg, end on WS.  Purl 2 rows (Garter Ridge – this is the top edge of bag and end of front lining).
Front:  Work even until piece measures 10½” from beg, end on WS.  Mark beg and end of last row.  Work even until piece measures 11½” from beg, end on WS.  Purl 2 rows (Garter Ridge).  Work even in St st until piece measures 2” above markers, end on WS.
Note:  Please read through this entire section before starting to knit.
Inc Row (RS):  K1, M1k, k to last st, M1k, k1 – 59 sts.  Rep this inc every RS row 4 times more, end on WS – 67 sts.  ** Work dec row, purl 1 row.  Work dec row, purl 1 row, knit 1 row, purl 1 row ** - 71 sts.  Rep from ** twice more – 79 sts.  AT THE SAME TIME, when piece measures 4” above markers, end on WS.  Mark center 9 sts.  Continuing to work incs as before, work Open Circle.  When Open Circle and all incs have been completed, work even on 79 sts until piece measures 8” above markers, end on WS.  Bind off 11 sts at beg of the next 2 rows – 57 sts.  Work even until piece measures 2½” above bound-off sts, end on WS.  Mark beg and end of last row – this is the center bottom of bag.
Back:  Work same as front, working lining at end and omitting Open Circle.  When lining measures 13½” above markers, end on WS – 57 sts.
Next Row (RS):  K4, bind off 49 sts, k to end.
Following Row:  P4, cast on 49 sts, p to end.  Complete same as front and front lining.  Bind off.

Finishing

Yo Yo:  With RS facing, using dpn’s, beg at lower edge of Open Circle, pick up and k96 sts around entire edge of Open Circle.  Mark for beg of rnd and carry marker up.  Purl 1 rnd.
Rnd 2:  * Yo, p2 tog, rep from * around.  Rep this rnd until yo yo measures 3” from beg.
Dec Rnd:  * P2 tog, rep from * around – 48 sts.  Bind off purlwise.  Break off yarn leaving an 8” long end.  Thread end into tapestry needle and thread end through every other st of bind-off.  Pull up tightly and secure.  Fold lining to inside along Garter Ridges at top edges of bag.  Sew cast-on and bound-off edges of lining together.  Sew side seams of lining.  Sew side seams of bag, leaving 2” below top Garter Ridges open.  Sew across back and front of bag working through double thickness of bag and lining along Garter Ridge 2” below top edge (this forms casing for dowels).  Insert one dowel through each 2” opening and casing on back and front, gathering top of bag.  Slide loops on handles over dowels, then glue finials in place at each end.

Crochet Barret


Size

To fit women's average size head

Finished Measurements

Approximately 11" across

Materials

2 Balls Berroco Pure® Merino DK (50 grs), #4555 Cardinal
Crochet hooks, sizes 4.50 mm (G) and 5.00 mm (H) OR SIZE TO OBTAIN GAUGE

Gauge

18 dc's = 4";  8 rnds = 4" in dc with smaller hook
TO SAVE TIME, TAKE TIME TO CHECK GAUGE

Stitch Glossary

FPDC (Front post dc)
Yo, insert hook from front to back to front again around post of st, yo and draw up a loop, (yo and draw through 2 loops on hook) twice
Dc dec (Decrease 1 dc)
* Yo, insert hook into next st, yo, pull up1 loop, yo, draw through 2 loops on hook, rep from * once more working through next st, yo and draw through all 3 loops on hook.

Beret

With smaller crochet hook, ch 4, join with a sl st to form a ring.
Rnd 1:  Ch 3 (counts as 1 dc), 7 dc's in ring, join with a sl st in top of beg ch-3 — 8 dc's.
Rnd 2:  Ch 3 (counts as 1 dc), dc in same st, 2 dc's in each dc around, join with a sl st in top of beg ch-3 — 16 dc's.
Rnd 3:  Rep Rnd 2 — 32 dc's.
Rnd 4:  Ch 3 (counts as 1 dc), dc in same st, dc in next dc, * 2 dc's in next dc, dc in next dc, rep from * around, join with a sl st in top of beg ch-3 — 48 dc's.
Rnd 5:  Ch 3 (counts as 1 dc), dc in next dc, * 2 dc's in next dc, 1 dc in each of the next 2 dc's, rep from * around, end 2 dc's in last dc, join with a sl st in top of beg ch-3 — 64 dc's.
Rnd 6:  Ch 3 (counts as 1 dc), * FPDC around post of next dc, dc in next dc, rep from * around, end FPDC around post of last dc, join with a sl st in top of beg ch-3 — 32 FPDC's with 1 dc between them.
Rnd 7:  Ch 3 (counts as 1 dc), * FPDC around post of next st, dc in same dc (inc made), dc in next dc, rep from * around, end FPDC around post of last dc, dc in same dc, join with a sl st in top of beg ch-3 — 32 FPDC's with 2 dc's between them.
Rnds 8 and 9:  Ch 3 (counts as 1 dc), * FPDC around post of next st, dc in each of the next 2 dc's, rep from * around, end FPDC around post of next st, dc in next dc, join with a sl st in top of beg ch-3.
Rnd 10:  Rep Rnd 7 — 32 FPDC's with 3 dc's between them.
Rnds 11 and 12:  Rep Rnds 8 and 9.
Rnd 13:  Rep Rnd 7 — 32 FPDC's with 4 dc's between them.
Rnd 14:  Rep Rnd 8.  Piece should measure approximately 11" across.
Rnd 15:  Ch 3 (counts as 1 dc), * FPDC around post of next st, dc in next dc, dc dec over next 2 sts (1 st decreased), dc in next dc, rep from * around, end FPDC around post of next st, dc in next dc, dc dec over next 2 sts, join with a sl st in top of beg ch-3 — 32 FPDC's with 3 dc's between them.
Rnd 16:  Ch 3 (counts as 1 dc), * FPDC around post of next st, dc dec over next 2 sts (1 st decreased), dc in next dc, rep from * around, end FPDC around post of next st, dc dec over next 2 sts, join with a sl st in top of beg ch-3 — 32 FPDC's with 2 dc's between them.
Rnd 17:  Ch 3 (counts as 1 dc), * FPDC around post of next st, dc dec over next 2 sts (1 st decreased), rep from * around, end FPDC around post of next st, dc dec over next st and top of beg ch-3 — 32 FPDC's with 1 dc between them.
Rnds 18, 19 and 20:  Ch 1 (counts as 1 sc), sc in each st around, join with a sl st in beg ch-1.  Check for fit.  More rows of sc may be added if necessary.
Rnd 21:  Change to larger crochet hook.  Ch 1, work 1 sl st in each st around, join with a sl st in beg ch-1.  Fasten off.