Translate

Monday, December 31, 2012

Crochet New year dishcloth


Skill: Easy
Size: About 10” square.
Materials:Worsted Weight Cotton Yarn:
White – 1½ oz, 75 yds (45 g, 68 m)
Blue – 1 oz, 50 yd (30 g, 45 m) Small amounts of various colors (for lettering).
Yarn needle.


Crochet Hook: Size H-8 (5.00 mm)
JOINING WITH SCWhen instructed to join with sc, begin with sl knot on hook, insert hook in st or sp indicated, yo and pull up a loop, yo and draw through both loops on hook.
DISHCLOTHRow 1:(Right Side) With White, ch 26, sc in 2nd ch from hook, [dc in next ch, sc in next ch] 12 times. (25 sts)
Row 2: Ch 1 (loosely),turn, dc in first sc, [sc in next dc, dc in next sc] across. (29 sts)
Row 3:Ch 1, turn, sc in first dc, [dc in next sc, sc in next dc] across. (29 sts)
Rows 4-21: Repeat Rows 2-3 nine times.
Row 22: Repeat Row 2 once. DO NOT FINISH OFF.
EdgingRnd 1: Ch 1, turn (right side facing), 3 sc in first sc, [sc in next sc] across to last sc, 3 sc in last sc; * work 23 sc evenly space across sides of rows *, working in unused lps of starting ch, 3 sc in first ch, [sc in next ch] across to last ch, 3 sc in last ch; rep from * to *; join with sl st to first sc. Finish off and weave in ends.
Rnd 2: With right sidefacing, join Blue with sl st in any corner sc, (ch 5, sl st) in same sc, [ch 5, sl st in next sc] around, working (sl st, ch 5, sl st) in each corner; join with sl st to first sl st. Finish off and weave in ends.
Letter HCh 8, sl st in 2ndch from hook, sl st in next 3 ch (mark last ch worked), ch 6, sl st in 2ndch from hook, sl st in next 3 ch (mark last ch worked), ch 4, sl st in 2ndch from hook, sl st in next 2 ch, sl st in 2ndmarked ch, sl st in next ch, sl st in first marked ch, sl st in next 3 ch. Finish off leaving long 18” end.
Letter ACh 9, sl st in first ch to form ring, * ch 4, sl st in 2ndch from hook, sl st in next 2 ch *, sl st in same ch as ring joining, sl st in next 2 ch on ring (mark last ch worked);rep * to * once; sl st in marked ch, sl st in remaining 6 ch of ring; join with sl st to first sl st. Finish off leaving long 18” end.
Letter PCh 9, sl st in first ch to form ring, * ch 5, sl st in 2ndch from hook, sl st in next 3 ch *, sl st in same ch as ring joining, sl st in remaining 7 ch of ring; join with sl st to first sl st. Finish off leaving long 18” end.
Letter YCh 1 (center ch), * ch 4, sl st in 2ndch from hook, sl st in next 2 ch, sl st in center ch, rep from * once more, ch 5, sl st in 2ndch from hook, sl st in next 3 ch, sl st in center ch. Finish off leaving long 18” end.
Letter NCh 22, sl st in 2ndch from hook, sl st in next 5 ch, skip next 2 ch, sl st in next 6 ch, (sl st, ch 2, sl st) in next ch, sl st in next 6 ch. Finish off leaving long 18” end.
Letter ECh 10, sl st in 2ndch from hook, sl st in next 2 ch (mark last ch worked), ch 7, sl st in 2ndch from hook, sl st in next 2 ch, (sl st, ch 2, sl st) in next ch, sl st in next 2 ch, sl st in marked ch, sl st in next 2 ch, (sl st, ch 2, sl st) in next ch, sl st in next 3 ch. Finish off leaving long 18” end.
Letter WCh 22, sl st in 2ndch from hook, sl st in next 5 ch, (sl st, ch 2, sl st) in next ch, sl st in next 2 ch, skip next 3 ch, sl st in next 2 ch, (sl st, ch 2, sl st) in next ch, sl st in next 6 ch. Finish off leaving long 18” end.
Letter RCh 1 (center ch), ch 8, sl st in center ch to form ring, * ch 5, sl st in 2ndch from hook, sl st in next 3 ch, sl st in center ch; rep from * once more; sl st in next 5 ch of ring, (sl st, ch 2, sl st) in next ch, sl st in next 2 ch; join with sl st to first sl st. Finish off leaving long 18” end.
Finishing – use photo as guide.
- Using long ends and yarn needle, sew letters to right side of dishcloth.

Sunday, December 30, 2012

Crochet six point snowflake


Ch 3, sl st into 1st ch OR make magic ring.

Round 1: Ch 2 (counts as 1 dc), 11 dc in ring; sl st in 2nd ch of starting ch 2. Pull magic circle tight.
Round 2: Ch 4 (counts as 1 dc and ch 2); *1 dc in next dc, ch 2; repeat from * around 10 times; sl st in 2nd ch of starting ch 4.
Round 3: Sl st in next ch 2 sp, ch 1, 3 sc in same sp, *ch 6, 1 dc in 3rd ch from hook and in each of next 2 ch, ch 4, 1 dc in 3rd ch from hook and in next ch, 1 dc in top half of next dc, 1 sc in same ch as dc just worked into, ch 1, 3 sc in next ch 2 sp, 3 sc in next ch 2 sp; repeat from * around 5 times, ending with 1st 3/sc in next ch 2 sp on final repeat; sl st in starting sc.
Round 4: Ch 20 (counts as 1 dc and ch 17), *1 dc over sc of Round 3 into next Round 2 dc (ch looping over heart), ch 17; repeat from * around 4 times; 1 dc over sc of Round 3 into next Round 2 dc, ch 14, 1 dc in 3rd ch of starting ch 20.
Round 5: Ch 2 (counts as 1 dc) *16 dc in next ch 17 sp; repeat from * around 4 times; 15 dc in next ch 17 sp; sl st in 2nd ch of starting ch 2.
Round 6: Ch 2 (counts as 1 dc), *sk 2 dc, 1 dc in next dc, ch 2, sk 2 dc, 1 dc in next dc, ch 2, sk 1 dc, 1 dc in next dc, ch 2, 1 dc in next dc, ch 2, sk 1 dc, 1 dc in next dc, ch 2, sk 2 dc, 1 dc in next dc, sk 2 dc, 1 dc in opening between this and next 16/dc group; repeat from * around 5 times, ending with sl st in 2nd ch of starting ch 2 instead of last dc of final repeat.
Round 7: *Ch 5, sk 1 dc, 1 sc in next dc, ch 5, 1 sc in next dc, ch 3, 1 dc in next ch 2 sp, ch 7, 1 dc in same sp, ch 3, 1 sc in next dc, ch 5, 1 sc in next dc, ch 5, sk 1 dc, 1 sc in next dc; repeat from * around 5 times, 1 sc in same st as final sl st of Round 6.
Round 8: 5 sc in each of next 2 ch 5 sp, 5 sc in next ch 3 sp, 2 sc in next ch 7 sp, 2 hdc in same sp, 2 dc in same sp, ch 3, 2 dc in 3rd ch from hook, ch 6, 1 sc in 6th ch from hook, ch 6, sl st in sc, ch 5, sl st in sc, ch 3, 2 dc in 3rd ch from hook, 2 dc in same ch 7 sp, 2 hdc in same sp, 2 sc in same sp, 5 sc in next ch 3 sp, 5 sc in each of next 2 ch 5 sp; repeat from * around 5 times, sl st in starting sc; bind off. Weave in ends.

Finish: Tape wax paper or plastic wrap to top of empty pizza box. Pin snowflake to box on top of wax paper or plastic wrap. 

Mix a few drops of water with a teaspoon of glue in small washable container. Paint snowflake with glue mixture. Sprinkle lightly with glitter. Wash paintbrush and container thoroughly. Allow snowflake to dry at least 24 hours. Remove pins. Gently peel snowflake from wax paper or plastic wrap. Attach 10-inch clear thread to one spoke, weaving in end. Wrap fishing line around tree branch (or tape to ceiling or any overhead surface) and watch the snowflake twirl freely whenever you walk by! Snowflake also may be taped to window or tied to doorknob or cabinet handle.

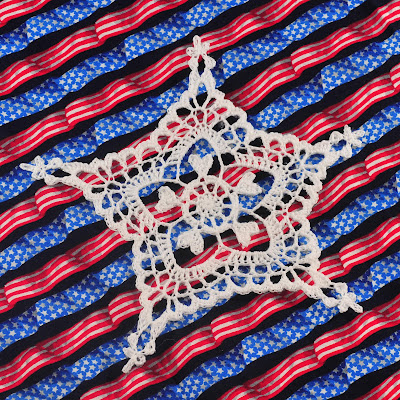
Crochet Five-Point Starflake


Finished Size: 8.5 inches from point to point
Materials: Size 10 crochet thread, size 8 crochet hook, empty pizza box, wax paper or plastic wrap, cellophane tape, glue, water, glitter, small container for glue/water mixture, paintbrush, stick pins that won't be used later for sewing, clear thread or fishing line

Instructions
century starflake
Ch 3, sl st into 1st ch OR make magic ring.

Round 1: Ch 2 (counts as 1 dc), 9 dc in ring; sl st in 2nd ch of starting ch 2. Pull magic circle tight.
Round 2: Ch 4 (counts as 1 dc and ch 2); *1 dc in next dc, ch 2; repeat from * around 8 times; sl st in 2nd ch of starting ch 4.
Round 3: Sl st in next ch 2 sp, ch 1, 3 sc in same sp, *ch 6, 1 dc in 3rd ch from hook and in each of next 2 ch, ch 4, 1 dc in 3rd ch from hook and in next ch, 1 dc in top half of next dc, 1 sc in same ch as dc just worked into, ch 1, 3 sc in next ch 2 sp, 3 sc in next ch 2 sp; repeat from * around 4 times, ending with 1st 3/sc in next ch 2 sp on final repeat; sl st in starting sc.

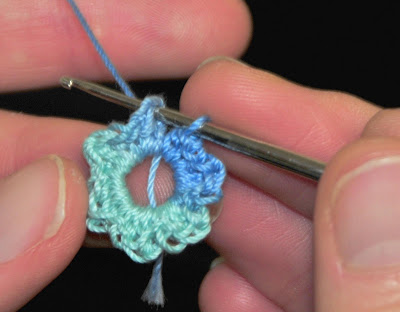
If you are having trouble with the heart tips, here is a photo tutorial I hope will help.

Round 4: Ch 20 (counts as 1 dc and ch 17), *1 dc over sc of Round 3 into next Round 2 dc (ch looping over heart), ch 17; repeat from * around 3 times; 1 dc over sc of Round 3 into next Round 2 dc, ch 14, 1 dc in 3rd ch of starting ch 20.
Round 5: Ch 2 (counts as 1 dc) *16 dc in next ch 17 sp; repeat from * around 3 times; 15 dc in next ch 17 sp; sl st in 2nd ch of starting ch 2.
Round 6: Ch 2 (counts as 1 dc), *sk 2 dc, 1 dc in next dc, ch 2, sk 1 dc, 1 dc in next dc, ch 2, sk 1 dc, 1 dc in next dc, [ch 2, 1 dc in next dc] 4 times, ch 2, sk 1 dc, 1 dc in next dc, ch 2, sk 1 dc, 1 dc in next dc, sk 2 dc, 1 dc in opening between this and next 16/dc group; repeat from * around 4 times, ending with sl st in 2nd ch of starting ch 2 instead of last 1dc of final repeat.
Round 7: *Ch 5, sk 1 dc, 1 sc in next dc, ch 5, 1 sc in next dc, ch 5, 1 sc in next dc, ch 3, 1 dc in next ch 2 sp, ch 7, 1 dc in same sp, ch 3, 1 sc in next dc, ch 5, 1 sc in next dc, ch 5, 1 sc in next dc, ch 5, sk 1 dc, 1 sc in next dc; repeat from * around 4 times, 1 sc in same st as final sl st of Round 6.
Round 8: * 5 sc in each of next 3 ch 5 sp, 5 sc in next ch 3 sp, 2 sc in next ch 7 sp, 2 hdc in same sp, 2 dc in same sp, ch 3, 2 dc in 3rd ch from hook, ch 6, 1 sc in 6th ch from hook, ch 6, sl st in sc, ch 5, sl st in sc, ch 3, 2 dc in 3rd ch from hook, 2 dc in same ch 7 sp, 2 hdc in same sp, 2 sc in same sp; repeat from * around 5 times; sl st in starting sc; bind off. Weave in ends.

Crochet Blue snowflake


Finished Size: 5 to 6.5 inches from point to point, depending upon hook size
Materials: Size 10 crochet thread, size 7, 8 or 10 crochet hook, empty pizza box, wax paper or plastic wrap, cellophane tape, glue, water, glitter, small container for glue/water mixture, paintbrush, stick pins that won't be used later for sewing, clear thread or fishing line
NOTE: I stiffened these flakes with spray starch and an iron on cotton setting.

If you're not reading this pattern on Snowcatcher, you're not reading the designer's blog. Please go here to see the original.

Instructions

Make magic ring.

Round 1: Ch 2 (does not count as dc on this round), 12 dc in ring, sl st across starting ch 2 into 1st dc. Pull magic ring tight.
Round 2: Ch 5 (counts as 1 dc and ch 2), *1 dc in next st, ch 2; repeat from * around for a total of 12 dc; sl st in 3rd ch of starting ch 5.
Round 3: Ch 2 (counts as 1 dc), *3 dc in next dc, ch 2, 3 dc in same dc, 1 dc in next dc; repeat from * around, ending with sl st in 2nd ch of starting ch 2 instead of last dc of final repeat, for a total of 6 ch/2 points. (If desired, bind off here for a cute small snowflake.)
Round 4: Ch 6 (counts as 1 dc and ch 3), 1 dc in same st as sl st, ch 3, *1 sc in next ch 2 sp, ch 3, sk next 3/dc group, 1 dc in next dc, ch 3, 1 dc in same dc, ch 3; repeat from * around, ending with 1 dc in 3rd ch of starting ch of Round 3 instead of last 2 dc of final repeat; ch 3, sl st in 3rd ch of starting ch 6. (If desired, bind off here for a cute small snowflake.)

Round 5: Ch 4 (counts as 1 dc and ch 1), 1 dc in starting ch 6 sp of Round 4, ch 1, *1 dc in next dc, ch 1, 1 dc in next ch 3 sp, ch 1, 1 dc in next sc, ch 1, 1 dc in next ch 3 sp, ch 1, 1 dc in next dc, ch 1, 1 dc in next ch 3 sp, ch 1; repeat from * around 4 times; 1 dc in next ch 3 sp, ch 1, 1 dc in next dc, ch 1, 1 dc in next ch 3 sp, ch 1, 1 dc in next sc, ch 1, 1 dc in next ch 3 sp, ch 1, sl st in 3rd ch of starting ch 4.
Round 6: Sl st into next ch 1 sp, ch 2 (counts as 1 dc), 1 dc same ch 1 sp, 2 dc in each of next 2 ch 1 sp, *3 dc in next ch 1 sp, ch 5, sl st in top of dc just made, 3 dc in next ch 1 sp, 2 dc in each of next 4 ch 1 sp; repeat from * around 4 times; 3 dc in next ch 1 sp, ch 5, sl st in top of dc just made, 3 dc in next ch 1 sp, 2 dc in next ch 1 sp; sl st in 2nd ch of starting ch 2.
Round 7: Ch 2 (counts as 1 hdc), *1 sc in each of next 2 st, 1 hdc in next st, 1 dc in each of next 2 st, 1 dc in next ch 5 loop, 3 tr in same loop, ch 6, 1 sc in 5th ch from hook, ch 6, sl st in sc, ch 5, sl st in sc, ch 2 (tri picot made), 3 tr in same loop, 1 dc in same loop, sk next 3 st, 1 dc in each of next 2 st, 1 hdc in next st; repeat from * around 5 times, omitting last hdc of final repeat; sl st in 2nd ch of starting ch 2; bind off. Weave in ends.

Finish: Tape wax paper or plastic wrap to top of empty pizza box. Pin snowflake to box on top of wax paper or plastic wrap. 

Mix a few drops of water with a teaspoon of glue in small washable container. Paint snowflake with glue mixture. Sprinkle lightly with glitter. Wash paintbrush and container thoroughly. Allow snowflake to dry at least 24 hours. Remove pins. Gently peel snowflake from wax paper or plastic wrap. Attach 10-inch clear thread to one spoke, weaving in end. Wrap fishing line around tree branch (or tape to ceiling or any overhead surface) and watch the snowflake twirl freely whenever you walk by! Snowflake also may be taped to window or tied to doorknob or cabinet handle.

Crochet color snowflake


Finished Size: 4.75 inches from point to point
Materials: Size 10 crochet thread, size 8 crochet hook, empty pizza box, wax paper or plastic wrap, cellophane tape, glue, water, glitter, small container for glue/water mixture, paintbrush, stick pins that won't be used later for sewing, clear thread or fishing line

Instructions

Ch 3, sl st into 1st ch OR make magic ring.

Round 1: Ch 2 (does not count as dc), 12 dc in ring; sl st in 2nd ch of starting ch 2. Pull magic circle tight.
Round 2: *Ch 3, 2 dc in same st, ch 3, sl st in same st (petal made), 1 sc in next st, sl st in next st; repeat from * around 4 times; ch 3, 3 dc in same st (3rd dc counts as final ch 3 and sl st).
Round 3: Ch 7 (counts as 1 dc and {ch 4}), [[ [1 dc in 3rd ch from hook], {{ch 3}}, *((1 dc in 3rd ch from hook)) ]], ch 1, 2 dc in 1st dc of next petal, 2 dc in next dc, {ch 4}; repeat from * around 5 times, omitting 2nd dc and ch 4 of final repeat; sl st in 3rd ch of starting ch 7.
Round 4: *1 sc in next ch, 1 sc in base of next [dc], 1 sc in 1st ch of {ch 4}, ch 2, 1 dc in same ch, 1 dc in top of [dc], 1 hdc between [[2 dcs]], 1 dc in base of ((next dc)), 1 dc in 1st ch of {{ch 3}}, ch 2, 1 sc in same st, 1 sc in top of ((dc)), 1 sc in next ch, sk next dc, sl st in next dc (top of petal), ch 8, 1 sc in 2nd ch from hook, (((1 sc in next ch))) (one nib made), ch 4, 1 sc in 2nd ch from hook, [[[1 sc in next ch]]] (2nd nib made), ch 6, 1 dc in 4th ch from hook, 1 dc in each of next 2 ch, 1 dc in next sc (2nd nib), ch 2, 1 sc in 2nd ch from hook, st st in top of dc (3rd nib made), 1 dc in next ch (between two nibs), 1 dc in next (((sc))) (1st nib), ch 2, 1 sc in 2nd ch from hook, sl st in top of dc (4th nib made), 1 dc in 5th ch of ch 8 (beneath 1st nib), 1 hdc in each of next 2 ch, 1 sc in each of next 2 ch, sl st in next dc (top of petal); repeat from * around 5 times; sl st in starting sc; bind off. Weave in ends.

NOTE: I did not glitter these flakes, but I might try pink glitter on the next batch.

Finish: Tape wax paper or plastic wrap to top of empty pizza box. Pin snowflake to box on top of wax paper or plastic wrap. 

Mix a few drops of water with a teaspoon of glue in small washable container. Paint snowflake with glue mixture. Sprinkle lightly with glitter. Wash paintbrush and container thoroughly. Allow snowflake to dry at least 24 hours. Remove pins. Gently peel snowflake from wax paper or plastic wrap. Attach 10-inch clear thread to one spoke, weaving in end. Wrap fishing line around tree branch (or tape to ceiling or any overhead surface) and watch the snowflake twirl freely whenever you walk by! Snowflake also may be taped to window or tied to doorknob or cabinet handle.

Crochet snowflake


Finished Size: 6 inches from point to point
Materials: Size 10 crochet thread, size 8 crochet hook, empty pizza box, wax paper or plastic wrap, cellophane tape, glue, water, glitter, small container for glue/water mixture, paintbrush, stick pins that won't be used later for sewing, clear thread or fishing line

Instructions

Ch 5, sl st into 1st ch OR make magic ring.

Round 1: Ch 3 (counts as 1 dc), into ring work 1 hdc, 1 sc, 1hdc, 1 dc, *ch 2, 1 dc, 1 hdc, 1 sc, 1 hdc, 1 dc; repeat from * around 4 more times; 1 dc into 3rd ch of starting ch 3. Do not pull magic ring too tight.
Round 1Round 2: Ch 5 (counts as 1 dc and 2 ch), *1 dc into next sc, ch 2, 1 dc into next ch 2 sp, ch 3, 1 dc into same ch 2 sp, ch 2; repeat from * around 4 more times, 1 dc into next sc, ch 2, 1 dc into next ch 2 sp, ch 1, 1 dc into 3rd ch of starting ch 5.
Round 3: Ch 3 (counts as 1 dc), 1 dc around dc post, ch 1, 1 tr around dc post, ch 1, sl st through top of tr, ch 1, 1 dc around dc post, 1 dc in 3rd ch of starting ch 5 of previous row, *1 hdc in next ch 2 sp, 1 sc in next dc, 1 hdc in next ch 2 sp, 1 dc in next dc, 1 dc in next ch 3 sp, ch 1, 1 tr in same sp, ch 1, sl st in top of tr, ch 1, 3 dc in same sp, ch 1, 1 tr in same sp, ch 1, sl st in top of tr, ch 1, 1 dc in same space, 1 dc in next dc; repeat from * around 4 times; 1 hdc in next ch 2 sp, 1 sc in next dc, 1 hdc in next ch 2 sp, 1 dc in next dc, 1 dc in starting sp, ch 1, 1 tr in same space, ch 1, sl st in top of tr, ch 1, 1 dc in same space, sl st in 3rd ch of starting ch 3.
Round 4: *Ch 3, 2 dc in 3rd ch from hook, ch 17, 1 sc in 10th ch from hook, ch 12, sl st in sc, ch 10, sl st in sc, sl st in next ch, ch 9, 2 dc in 3rd ch from hook, sl st in middle dc of 3 dc group of next petal; repeat from * around 5 times; st st in middle dc of 3 dc group at start of round; bind off. Weave in ends.

Finish: Tape wax paper or plastic wrap to top of empty pizza box. Pin snowflake to box on top of wax paper or plastic wrap.

Mix a few drops of water with a teaspoon of glue in small washable container. Paint snowflake with glue mixture. Sprinkle lightly with glitter. Wash paintbrush and container thoroughly. Allow snowflake to dry at least 24 hours. Remove pins. Gently peel snowflake from wax paper or plastic wrap. Attach 10-inch clear thread to one spoke, weaving in end. Wrap fishing line around tree branch (or tape to ceiling or any overhead surface) and watch the snowflake twirl freely whenever you walk by! Snowflake also may be taped to window or tied to doorknob or cabinet handle.

Crochet Snowflake with center flower


Finished Size: 6.25 inches from point to point
Materials: Size 10 crochet thread, size 11 crochet hook, empty pizza box, wax paper or foil, cellophane tape, glue, water, glitter, small container for glue/water mixture, paintbrush, stick pins that won't be used later for sewing, clear thread or fishing line

Instructions

Ch 4, sl st into 1st ch OR make magic ring.

Round 1: *2 sc into ring, ch 3; repeat 4 times, 2 sc in ring, tr in starting sc. Pull magic circle tight, but leave opening big enough to allow stitches inside it to lay flat.
Round 2: Working around post of tr just made, 1 sc, 1 hdc, 1 dc, 1 hdc, 1 sc; working over next ch 3 sp, 1 sc, 1 hdc, 1 dc, 1 hdc, 1 sc; repeat from * around 4 times; ch 2.
Round 3: Working along back of flake, sc through back bottom two loops of dc of next petal, ch 3; repeat from * around 5 times; sl st in starting sc of this row.
Round 4: *Sl st in next ch 3 sp, in same ch 3 sp work 1 sc, 1 hdc, 3 dc, 1 hdc, 1 sc, sl st; repeat from * around 5 times, ch 2.
Round 5: Working along back of flake, sc through back bottom two loops of middle dc of next petal, ch 4; repeat from * around 5 times; sl st in starting sc of this row.
Round 6: *Sl st in next ch 4 sp, in same ch 4 sp work 1 sc, 1 hdc, 2 dc, 2 tr, 2 dc, 1 hdc, 1 sc, sl st; repeat from * around 5 times, ch 2.
Round 7: Working along back of flake, sc through back bottom middle two loops of 2tr of next petal, ch 5; repeat from * around 4 times; ch 2, dc in starting sc of this row.
Round 8: Ch 3 (counts as 1 dc), 2 dc around post of dc just worked at end of Row 7, ch 1, sc in same sc as dc post just worked around, *ch 1, 3 dc in next ch 5 sp, ch 2, 3 dc in same ch 5 sp, ch 1, sc in next sc; repeat from * around 4 times; ch 1, 3 dc around dc post from end of Row 7, ch 1, dc in 3rd ch of starting ch 3.
Round 9: Ch 3 (counts as 1 dc), 2 dc around post of dc just worked at end of Row 8, ch 2, sc in next sc, *ch 2, 3 dc in next ch 2 sp, ch 3, 3 dc in same ch 2 sp, ch 2, sc in next sc; repeat from * around 4 times; ch 2, 3 dc around ch 1 from end of Row 8, dc in 3rd ch of starting ch 3.
Round 10: Ch 3 (counts as 1 dc), 2 dc around post of dc just worked at end of Row 9, *ch 1, sc in 1st dc of 3 dc group below, ch 3, sc in 3rd dc of same 3 dc group, ch 7, sc in 5th ch from hook, ch 5, sl st in sc, ch 4, sl st in same sc, ch 2, sc in 1st dc of next 3 dc group, ch 3, sc in 3rd dc of same 3 dc group, ch 1, 3 dc in next ch 3 sp, ch 9, [3 dc in same ch 3 sp]; repeat from * around 5 times ending with sl st in 3rd ch of starting ch 3 instead of [3 dc in same ch 3 sp] on final repeat.
Round 11: Ch 1, *sc in next dc, ch 3, skip 1 dc, sc in next dc, ch 9, sc in 2nd ch from hook, ch 2, sc in 2nd ch from hook, ch 2, sc in 2nd ch from hook, dc in next ch after 3 picots just made, hdc in next ch, sc in next ch, ch 4, sc in next dc (after tri-picot below), ch 3, skip 1 dc, sc in next dc, in next ch 9 sp work sc, hdc, dc, tr, dtr, ch 4, 2 dc in 3rd ch from hook, ch 1, 2 dc in same ch 9 sp, ch 4, sc in 2nd ch from hook, hdc in next ch, dc in next ch, 2 dc in same ch 9 sp, ch 4, 2 dc in 3rd ch from hook, ch 1, in same ch 9 sp work dtr, tr, dc, hdc, sc; repeat from * around 5 times; sl st in starting sc; bind off. Weave in ends.

Finish: Tape wax paper or foil to top of empty pizza box. Pin snowflake to box on top of wax paper or foil.

crochet White snowflake dishcloh


Skill: Easy
Size: About 10″ diameter
Materials: Worsted Weight Cotton Yarn: White – 2 oz, 100 yds (60 g, 92 m) (Lily Sugar ‘n Cream)Crochet Hook: Size H-8 (5.00 mm)
Special StitchesPicot: Ch 3, sl st in last sc made.
DISHCLOTH:Rnd 1: (Right Side) Ch 4, join with sl st to first ch to form ring; ch 1, 6 sc in ring; join with sl st to first sc.
Rnd 2: Ch 1, 2 sc in each sc around; join as before. (12 sc)
Rnd 3: Ch 5 (counts as first dc and ch 2, now and throughout), [dc in next sc, ch 2] around; join with sl st to first dc. (12 dc, 12 ch-2 lps)
Rnd 4: Ch 3 (counts as first dc now and throughout), dc in same sp as joining, [2 dc in next ch-2 sp, dc in next dc, 2 dc in next ch -2 sp, 2 dc in next dc] 5 times, 2 dc in next ch-2 sp, dc in next dc, 2 dc in next ch-2 sp; join as before. (42 dc)
Rnd 5: Ch 5, dc in next dc, ch 2, skip next dc, [dc in next dc, ch 2, dc in next dc, ch 2, skip next dc] around; join as before. (28 dc, 28 ch-2 lps)
Rnd 6: Ch 3, 2 dc in next ch-2 lp, [dc in next dc, 2 dc in next ch-2 lp] around; join as before. (84 dc)
Rnd 7: Ch 1, sc in same st as joining, * skip next 2 dc, (dc, ch1) 4 times in next dc, dc in same dc, skip next 2 dc, sc in next 9 dc; rep from * around, omitting last sc; join with sl st to first sc. (54 sc, 30 dc)
Rnd 8: Sl st in first dc, ch 1, sc in same st, picot, [sc in next ch-1 sp, sc in next dc, picot] 4 times, * skip next sc, sc in next 4 sc, [ch 3, sl st in last sc made] 3 times, sc in next 3 sc, skip next sc, sc in next dc, picot, [sc in next ch-1 sp, sc in next dc, picot] 4 times; rep from * 4 times more, skip next sc, sc in next 4 sc, [ch 3, sl st in last sc made] 3 times, sc in next 3 sc, skip next sc; join with sl st to first sc. Finish off and weave in ends.

Crochet baby A Jumper dress


Sizes
Jumper6 mos(12 mos-18 mos-24 mos)
To fit chest measurement
6 mos 17 ins [43 cm]
12 mos 18 ins [45.5 cm]
18 mos 19 ins [48 cm]
24 mos 21 ins [53.5 cm]
Finished chest
6 mos 20 ins [51 cm]
12 mos 22 ins [56 cm]
18 mos 23 ins [58.5 cm]
24 mos 25 ins [63.5 cm]
Hat6/12 mos(18/24 mos) 
To fit head measurement

6/12 mos 14 ins [35.5 cm]
18/24 mos 16 ins [40.5 cm]
Gauge
Jumper
4½ 3-dc groups and 10 rows = 4 ins [10 cm] in pat.
Hat
17 sc and 18 rows = 4 ins [10 cm].
Stitch Glossary
Beg = Beginning.
Ch = Chain(s).
Dc = Double crochet.
Hdc = Half double crochet.
Pat = Pattern.
Rem = Remaining.
Rep = Repeat.
Rnd(s) = Round(s).
RS = Right side.
Sc = Single crochet.
Sl st = Slip stitch.
Sp(s) = Space(s).
St(s) = Stitch(es).
Tr = Treble crochet.
WS = Wrong side.
Yoh = Yarn over hook.
Instructions
The instructions are written for smallest size. If changes are necessary for larger sizes the instructions will be written thus ( ). When only one number is given, it applies to all sizes. For ease in working, circle all numbers pertaining to your size.
Materials
Jumper
Bernat® Softee Baby (Solids: 140 g / 5 oz) (361 m / 395 yds)
Main Color (MC) (30424 Soft Red) 1(1-1-2) ball(s)
Contrast A (30613 Warm Yellow) 1(1-1-1) ball
Contrast B (30233 Fresh Green) 1(1-1-1) ball
Bernat® Softee Baby (Ombres: 120 g / 4.25 oz) (304 m / 333 yds)
Contrast C (31424 Summer Ombre) 1(1-1-1) ball
Hat
Bernat® Softee Baby (Solids: 140 g / 5 oz) (361 m / 395 yds)
Main Color (MC) (30424 Soft Red) 1(1) ball
Contrast A (30613 Warm Yellow) 1(1) ball
Bernat® Softee Baby (Ombres: 120 g / 4.25 oz) (304 m / 333 yds)
Contrast B (31424 Summer Ombre) 1(1) ball
Size 4 mm (U.S. G or 6) crochet hook or size needed to obtain gauge.
Jumper
Front and Back (make alike).
With MC, ch 48 (52-56-60).
1st row: (RS). 1 dc in 4th ch from hook (counts as 2 dc). *Miss next ch. 1 sc in next ch. Miss next ch. 3 dc in next ch. Rep from * to last 4 ch. Miss next ch. 1 sc in next ch. Miss next ch. 2 dc in last ch. Turn.
2nd row: Ch 1. 1 sc in first dc. *Miss next dc. 3 dc in next sc. Miss next dc. 1 sc in next dc. Rep from * to last sc and 2 dc. 3 dc in next sc. Miss next dc. 1 sc in last dc. Turn. 11 (12-13- 14) 3-dc groups.
3rd row: Ch 3 (counts as dc). 1 dc in first sc. *Miss next dc. 1 sc in next dc. Miss next dc. 3 dc in next sc. Rep from * to last 3 dc and sc. Miss next dc. 1 sc in next dc. 2 dc in last sc. Turn. Rep last 2 rows for pat 2 (2-3-4) times more.
**Next row: (Inc row). Ch 1. 2 sc in first dc. *Miss next dc. 3 dc in next sc. Miss next dc. 1 sc in next dc. Rep from * to last sc and 2 dc. 3 dc in next sc. Miss next dc. 2 sc in last dc. Turn. 
Next row: Ch 1.1 sc in first sc. *3 dc in next sc. Miss next dc. 1 sc in next dc. Miss next dc. Rep from * to last dc and 2 sc. 3 dc in next sc. 1 sc in last sc.
Rep 3rd and 2nd rows once more, then 3rd row once.** 
Rep from ** to ** 4 times more. 16 (17-18-19) 3-dc groups. Cont even in pat until work from beg measures 11 (12-13½-15) ins [28 (30.5-34.5-38) cm], ending with a WS row. Fasten off.
Bodice: 1st row: With RS of work facing, join MC with sl st to right corner at foundation ch. Ch 1. Work 41 (47-49-53) sc evenly into rem loops of foundation ch. Turn.
2nd row: Ch 1. 1 sc in each sc to end of row. Fasten off.
3rd row: (RS). Miss first 3 (4-5- 6) sc. Join A with sl st to next sc. Ch 1. 1 sc in same sp as sl st. *Ch 1. Miss next sc. 1 sc in next sc. Rep from * to last 3 (4-5-6) sc. Fasten off. 35 (39-39-41) sc.
4th row: (RS). Join MC to first missed sc of 2nd row. Ch 1. Working over 3rd row, 1 sc in same sp as sl st. *Ch 1. Miss next sc. 1 sc in next missed sc of 2nd row. Rep from *, ending with 1 sc in last missed sc of 2nd row. Turn. Leave rem sts unworked. 33 (37-37-39) sts.
5th row: Ch 1. Draw up a loop in first sc and next ch-1 sp. Yoh and draw through all 3 loops on hook – sc2tog made. *1 sc in next sc. 1 sc in next ch-1 sp. Rep from * to last ch-1 sp and sc. Sc2tog over last 2 sts. Turn.
6th to 8th rows: Ch 1. Sc2tog over first 2 sts. 1 sc in each sc to last 2 sts. Sc2tog over last 2 sts. Turn. 25 (29- 29-31) sts at end of 8th row.
9th row: (RS). Join B with sl st to first sc. Ch 1. 1 sc in same sp as sl st. *Ch 1. Miss next sc. 1 sc in next sc. Rep from * to end of row. Fasten off.
10th row: (RS). Join MC to first missed sc of 8th row. Ch 1. Working over 9th row into missed sts of 8th row, 1 sc in same sp as sl st. *Ch 1. Miss next sc. 1 sc in next missed sc of 8th row. Rep from *, ending with 1 sc in last missed sc of 8th row. Turn. Leave rem sc unworked. 23 (27-27-29) sts.
11th row: As 5th row.
12th row: Ch 1. Sc2tog over first 2 sts. 1 sc in each sc to last 2 sts. Sc2tog over last 2 sts. Turn. 19 (23- 23-25) sts.
13th row: Ch 1. 1 sc in each st to end of row. Fasten off.
Straps (make 2).
With MC, ch 28 (32-34-38).
1st row: (RS). 1 sc in 2nd ch from hook. 1 sc in each ch to end of ch. Turn.
2nd row: Ch 1. 1 sc in each sc to end of row. Turn. Rep last row 3 times more, omitting turn at end of last row.
Next row: Working from left to right instead of right to left as usual, work 1 reverse sc in each sc to end of row, working along side of strap, 1 reverse sc in each row to corner, working in rem loops of foundation ch, 1 reverse sc in each ch to end of row (see Diagram on page 20). Fasten off.
Flowers (buttons) (make 2).
With C, ch 2.
1st rnd: 6 sc in 2nd ch from hook. Join with sl st to first sc. 6 sc.
2nd rnd: Ch 1. 2 sc in each sc around. Join with sl st to first sc.
3rd rnd: Ch 1. (1 sc. 3 dc. 1 sc) in same sp as sl st. *Miss next sc. Sl st in next sc. Miss next sc. (1 sc. 3 dc. 1 sc) in next sc. Rep from * to last 3 sc. Miss next sc. Sl st in next sc. Miss last sc. Join with sl st to first sc.
Fasten off.
Finishing
Sew side seams. Sew Straps to Back.
Try garment on and mark length for Straps. Sew ends of Straps in position to Front.
Sew flowers (buttons) through both thicknesses.
Flowers (appliqués)
(With A, make 4. With B, make 2. With C, make 2).
Ch 4.
1st rnd: 11 dc in 4th ch from hook. Join with sl st to first sc. 12 dc.
2nd rnd: Ch 1. (1 sc. 3 dc. 1 sc) in same sp as sl st. *Sl st in next dc. (1 sc. 3 dc. 1 sc) in next dc. Rep from * to last 3 dc. Miss next dc. Sl st in next dc. Miss last dc. Join with sl st to first sc. Fasten off.
Sew on flowers as shown in picture.
Butterfly (make 1).
With C, ch 13.
1st rnd: 1 sc in 2nd ch from hook. 1 sc in each of next 9 ch. Sl st in next ch. 6 hdc in last ch. Do not turn. Working into rem loops of foundation ch: sl st in next ch. Miss next ch. (1 tr. Ch 3. Sl st in top of tr – Picot made. 6 tr) all in next ch. Miss next 2 ch. Sl st in next ch. Miss next ch. 5 dc in next ch. Picot. Miss next ch. 1 sc in next ch. 2 dc in next ch. Join with sl st to first sc.
2nd rnd: Sl st in first sc. Miss next sc. (1 dc. Picot. 4 dc) all in next sc. Miss next sc. Sl st in next sc. Miss next 2 sc. (7 tr. Picot) all in next sc. Miss next sc. Sl st in next st. Fasten off. Sew Butterfly in position as shown.
Hat
With B, ch 2.
1st rnd: 6 sc in 2nd ch from hook. Join with sl st to first sc.
2nd and 3rd rnds: Ch 1. 2 sc in each sc around. Join with sl st to first sc. 24 sc at end of 3rd rnd.
4th rnd: Ch 1. 1 sc in each sc around. Join with sl st to first sc.
5th rnd: Ch 1. *1 sc in each of next 3 sc. 2 sc in next sc. Rep from * around. Join with sl st to first sc. 30 sc.
6th rnd: Ch 1. *1 sc in each of next 4 sc. 2 sc in next sc. Rep from * around. Join with sl st to first sc. 36 sc.
7th rnd: Ch 1. *1 sc in each of next 5 sc. 2 sc in next sc. Rep from * around. Join with sl st to first sc. 42 sc.
8th rnd: Ch 1. *1 sc in each of next 6 sc. 2 sc in next sc. Rep from * around. Join MC with sl st to first sc. 48 sc.
9th rnd: With MC, ch 2 (does not count as st). 1 hdc in each sc around. Join with sl st to first hdc.
10th rnd: Ch 1. *1 sc in each of next 7 hdc. 2 sc in next hdc. Rep from * around. Join with sl st to first sc. 54 hdc.
11th rnd: As 9th rnd.
12th rnd: Ch 1. *1 sc in each of next 8 hdc. 2 sc in next hdc. Rep from * around. Join with sl st to first sc. 60 sc.
13th rnd: As 9th rnd.
Size 6/12 mos only: 14th rnd: Ch 1. *1 sc in each of next 19 hdc. 2 sc in next hdc. Rep from * around. Join with sl st to first sc. 63 sc.
Size 18/24 mos only: 14th rnd: Ch 1. *1 sc in each of next 9 hdc. 2 sc in next hdc. Rep from * around. Join with sl st to first sc. 66 sc.
15th rnd: As 9th rnd.
16th rnd: Ch 1. *1 sc in each of next 10 hdc. 2 sc in next hdc. Rep from * around. Join with sl st to first sc. 72 sc.
Both sizes: Place marker at end of last rnd.
Next rnd: Ch 2 (does not count as st). 1 hdc in each sc around. Join with sl st to first hdc.
Next rnd: Ch 1. 1 sc in each hdc around. Join with sl st to first sc. Rep last 2 rnds until work from marked rnd measures 3½ (4) ins [9 (10) cm]. Join B at end of last rnd.
Next rnd: With B, ch 1. 1 sc in each of next 3 (2) hdc. *2 sc in next hdc. 1 sc in each of next 5 (6) hdc. Rep from * around. Join with sl st to first sc. 73 (82) sc.
Next rnd: Ch 1. 1 sc in each sc around. Join with sl st to first sc. Rep last rnd for 2 ins [5 cm]. Fasten off.
Roll up section with B. Secure at back.
Petals (make 6).
With A, ch 11.
1st row: (RS). 1 sc in 2nd ch from hook. 1 sc in each ch to end of ch. Turn. 10 sc.
2nd and 3rd rows: Ch 1. 1 sc in each sc to end of row. Turn.
4th row: Ch 1. Draw up a loop in each of first 2 sc. Yoh and draw through all 3 loops on hook – sc2tog made. 1 sc in each sc to last 2 sts. Sc2tog over last 2 sts. Turn. Rep last row twice more. 4 sts. Fasten off.
With RS facing, join A with sl st to right bottom at foundation ch.
1st row: Ch 1. Work 16 sc around petal to opposite end of foundation ch. Do not turn.
2nd row: Working from left to right instead of right to left as usual, work 1 reverse sc in each sc to end of row. Fasten off.
FINISHING
Sew petals around 9th rnd of Hat, overlapping as shown in picture.

Crochet Lace Napkin Edging


Measurement: Approx 3/4 ins [2 cm] wide.
Materials
Bernat Handicrafter Crochet Thread (3 oz/85 g; 371 yds/339 m)
1 ball of 31201 (Still Water) or (31426 (Rosy Rose) or 31222 (Ripe Avocado)
Size 1.75 mm (U.S. 4) steel crochet hook or size needed to obtain gauge. Cloth napkins. Vanishing fabric marking pen.
Note: 1 ball makes approx 300 ins [760 cm] of Edging. Napkins must measure in full inch increments for
edging to fit correctly, eg. 12 x 12 ins, 13 x 13 ins, etc.
GAUGE: 30 sc and 32 rows = 4 ins [10 cm].
INSTRUCTIONS:
Prepare Napkin: Beg at any napkin corner, mark edges of napkin with dots using vanishing fabric marking pen at 1/8 inch [3 mm] intervals (8 marks per inch) to ensure even placement of first rnd of sts.
Edging: Join thread with sl st at 8th st mark to the right of any corner.
1st rnd: Ch 1. 1 sc in same sp as last sl st. 1 sc in each of next 6 st marks. *3 sc in each of next 2 st marks. 1 sc in each st mark until last st mark at next corner. Rep from * twice more. 3 sc in each of next 2 st marks. 1 sc in each st mark to end of rnd. Join with sl st to fi rst sc.
2nd rnd: Ch 6. Miss next 3 sc. **1 sc in next sc. Ch 3. Miss next 3 sc. 1 dc in next sc. Ch 2. 1 dc in next sc. Ch 3. 1 dc in next sc. Ch 2. 1 dc in next sc. Ch 3. Miss next 3 sc. *1 sc in next sc. Ch 3. Miss next 3 sc. (1 dc. Ch 3. 1 dc) in next sc. Ch 3. Miss next 3 sc.* Rep from * to * across until 5th sc from corner. Rep from ** twice more. 1 sc in next sc. Ch 3. Miss next 3 sc. 1 dc in next sc. Ch 2. 1 dc in next sc. Ch 3. 1 dc in next sc. Ch 2. 1 dc in next sc. Ch 3. Miss next 3 sc. Rep from * to * across until beg ch 6. Join with sl st to 3rd ch of ch 6.
3rd rnd: **Ch 7. 1 sc in next dc. Ch 5. 1 sc in next dc. (Ch 5. 1 sc. Ch 6. 1 sc. Ch 5. 1 sc) in next ch-3 sp. Ch 5. 1 sc in next dc. *Ch 7. Miss next: ch-3 sp, 1 sc and ch-3 sp. 1 sc in next dc. (Ch 5. 1 sc. Ch 6. 1 sc. Ch 5. 1 sc) in next ch-3 sp. Rep from * across to 2nd last dc from corner. Rep from ** 3 times more. Join with sl st to 3rd ch of beg ch 7. Fasten off .

Crochet Snowman Dishcloth


Skill: Easy
Size: About 9” square.
Materials: 
Worsted Weight Cotton Yarn: 
Blue – 1½ oz, 75 yds (45 g, 68 m) 
White – 1 oz, 50 yd (30 g, 45 m)
 Black – ½ oz, 25 yd (15 g, 23 m)
 Small amount Orange. (Sugar ‘n Cream) Yarn needle.
Crochet Hook: Size H-8 (5.00 mm)
JOINING WITH SCWhen instructed to join with sc, begin with sl knot on hook, insert hook in st or sp indicated, yo and pull up a loop, yo and draw through both loops on hook.
Special StitchesPicot: Ch 3, sl st in 3rd ch from hook.
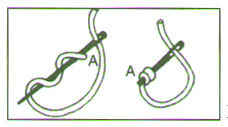
French KnotBring yarn threaded needle up from wrong to right side of work at A. Wrap yarn 2-3 times around needle. Tighten the twists and insert needle again at A. Pull needle with firm even pressure until the yarn slides through the wrapped yarn, making a knot that lies on the right side as shown below.
DISHCLOTHRow 1: (Right Side) With Blue, ch 26, sc in 2nd ch from hook, (sc in next ch) across. (25 sc)
Rows 2-3: Ch 1, turn, sc in each sc across.
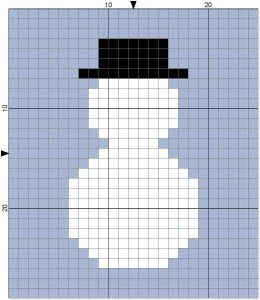
Rows 4-26: Working in sc, follow chart making necessary color changes with White and Light Green.
Rows 27-28: Ch 1, turn, sc in each sc across.
At the end of Row 28, DO NOT FINISH OFF.

EdgingRnd 1: Ch 1, turn, 3 sc in first sc, [sc in next sc] across to last sc, 3 sc in last sc; * working in sides of rows, evenly sc to corner *, working in unused lps of starting ch, 3 sc in first ch, [sc in next ch] across to last ch, 3 sc in last ch; rep from * to *; join with sl st to first sc. Finish off and weave in ends.
Rnd 2: With right side facing, join White with sc to center sc of any corner 3-sc group, picot, sc in same sc, [skip next sc, sc in next sc, picot] around, working (sc, picot, sc) in each corner; join. Finish off and weave in ends.
Finishing – use photo as guide
- Using Orange and yarn needle, embroider straight stitches for Carrot nose.
- Using Black and yarn needle, embroider French knots for Eyes and buttons