Translate

Saturday, February 22, 2014

Sew Baby Peasant Dress


Doesn’t every baby girl need a dress that’s just as sweet as she is?
This simple peasant dress pattern is sized 0-3m (approximately 8-12lbs), and is an easy project that is great for all sewing abilities, even beginners.
The elastic neckline makes for an easy on and off, keeping both you and your little one smiling 
Materials:
3/4 yd 100% quilting cotton fabric (45” wide)
1/4″ wide elastic – approximately 30”
optional: rick rack for trim hem (40″ in length)
Instructions:
*All seam allowances to be 3/8″ unless otherwise noted.*
1. Print pattern pieces. Make sure your printer is set to print at 100% and not to scale the file down in size. Lay out fabric with both selvage edges folded in to center of fabric (creating two folded edges – on on each side with the selvages in the middle of the fabric) and right side inward. Cut out fabric pieces as directed on pattern pieces. If you prefer a plain hem rather than rick rack trim, add an extra 1/4-1/2″ to the bottom of the bodice pattern. The length of the dress is designed to hit at or just above the knee so it can be worn with tights or legwarmers, so feel free to add some extra length if you wish to make it longer!
2. Right sides together, pin and stitch one sleeve piece at curve to armhole curve on one bodice piece.
3. Right sides together, pin and stitch remaining sleeve piece at curve to remaining curve on bodice piece.
4. Serge or zig zag raw edges and press seams (technically seams should always be pressed toward the bodice, but I pressed them toward the sleeves so take your pick).
5. Right sides together, pin and stitch remaining curve on sleeves to armhole curves of remaining bodice piece. Serge or zig zag raw edges and press seams.
6. If using a serger, serge bottom of each sleeve, removing ¼” of fabric. If not using a serger, press bottom of each sleeve ¼” toward wrong side of fabric.
7. Press bottom of each sleeve ½” toward wrong side (if not using serger the bottom of each sleeve will now have two folds). You can do this step after you sew the side seams in step 9 if you wish, but pressing them now gives more room to work with and I personally find it easier.
8. If using a serger, serge around neckline, removing ¼” of fabric. If not using a serger, press top of neckline ¼” toward wrong side of fabric. Press neckline ½” toward wrong side (if not using serger the neckline will now have two folds).
9. Right sides together, stitch dress together at each side from bottom of dress through folded edge of sleeve, unfolding pressed edge on sleeve. Serge or zig zag raw side seams and press seams.
10. Fold each sleeve back along pressed edge and stitch close serged/folded edge of fabric, forming a casing for elastic and leaving a small opening (it’ll be a bit tricky to maneuver around your sewing machine so take your time and it’ll turn out great).
11. Stitch close to serged/pressed edge of fabric at neckline, forming a casing for elastic and leaving a small opening.
12. Cut 2 pieces of elastic, each 7″ in length. On each sleeve, insert elastic through opening using a safety pin and stitch ends together using a zig zag stitch, overlapping elastic ½” on each end.
Note: 7″ of elastic will allow for a chubby baby’s arm circumference. If after inserting your elastic it looks a bit loose for your baby, you may want to trim 1/2″-1″ off the elastic before stitching the ends together.
13. Stitch opening closed on each sleeve.

14. Cut 12” length of elastic. Insert elastic through opening using a safety pin and stitch ends together using a zig zag stitch, overlapping elastic ½” on each end. Stitch opening closed.
 
  
15. Serge bottom hem of dress, removing ¼” of fabric, or press hem ¼” toward wrong side of fabric (if you’re adding rick rack to the hem you’ll also want to zig zag stitch the raw edge before pressing it).

If not sewing rick rack trim at hem: Press hem another ½” toward wrong side of fabric. Stitch close to folded edge around entire hem of dress.
16. For rick rack trim, align outer scalloped edge of rick rack with bottom edge of dress and stitch around entire circumference of bottom of dress down center of rick rack. Overlap rick rack at beginning and end and trim excess.
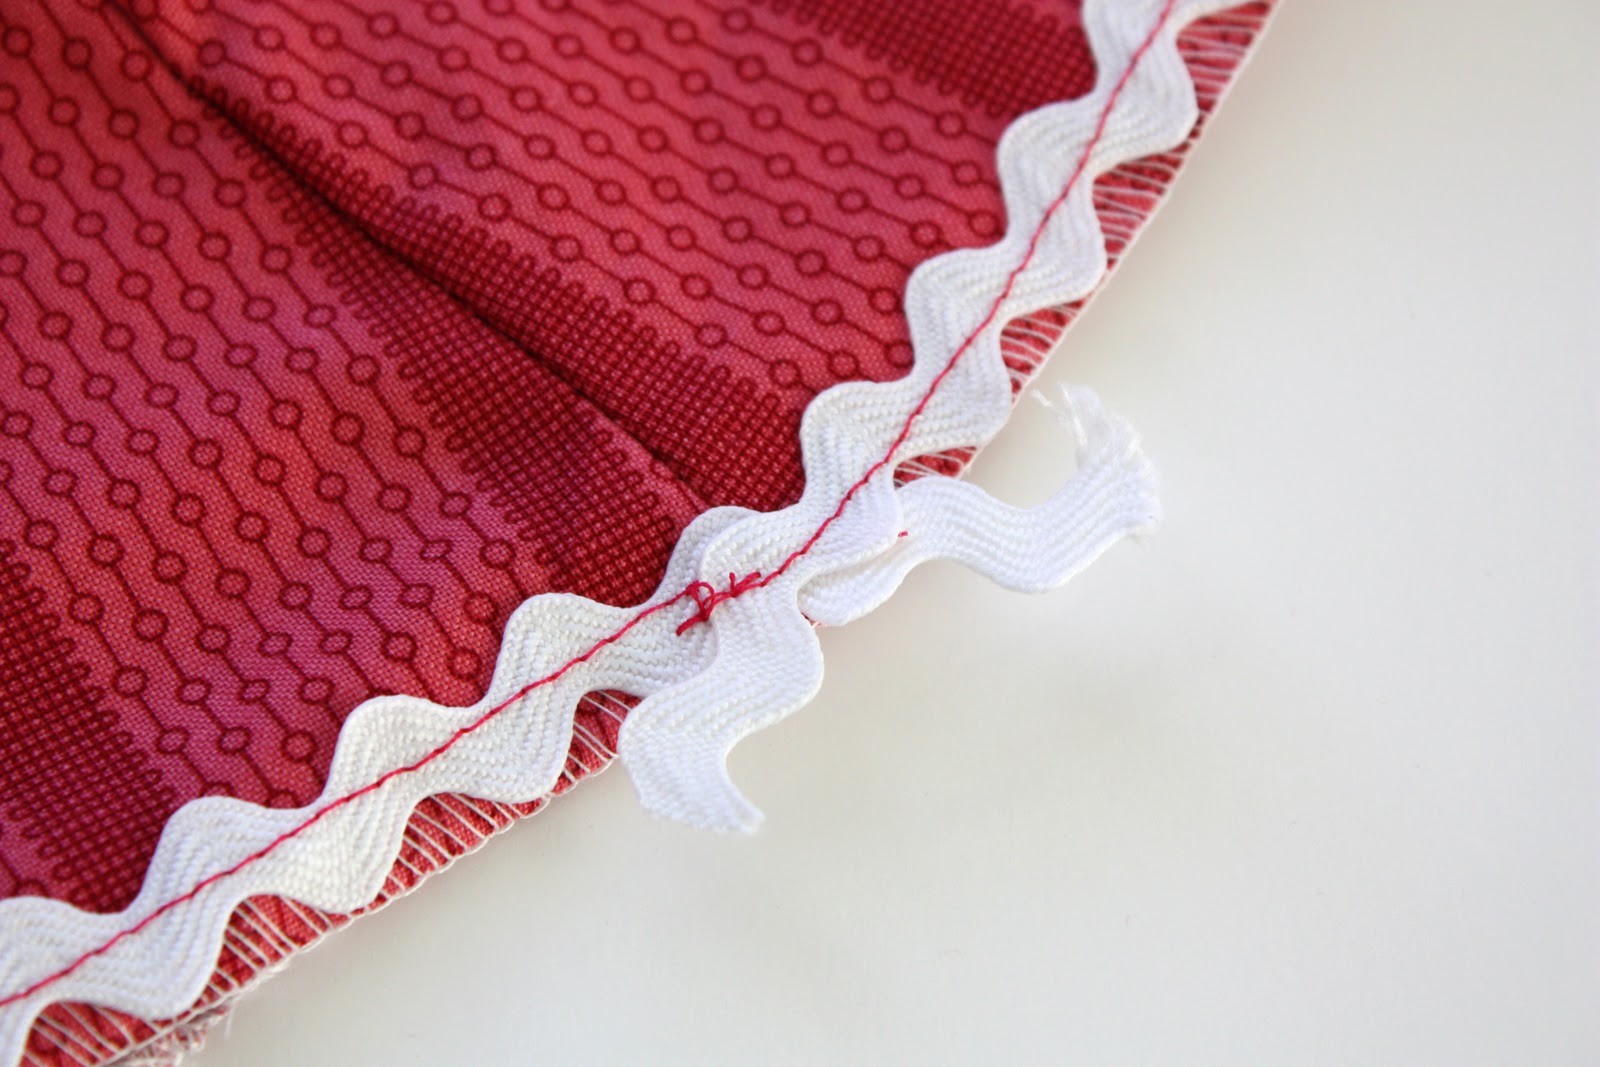
17. Press rick rack to wrong side of fabric, leaving one scalloped edge exposed on right side of dress. Topstitch close to edge of fabric around entire hem of dress.
Great job, you are done!

Wednesday, February 19, 2014

Hand Towel to Baby Bib

Materials:
hand towel (the larger the better — I found the white one pictured in these instructions at Ikea for a whopping 50 cents – places like Ross and TJ Maxx are great too)
knit scraps (rib knit works best) – cut a 12″x3″ piece
Instructions:
1. Using a bowl or other object approximately 5-6″ in diameter, trace a circle in the middle of the towel, 6″ from one end.  I know, white is not a smart choice for a bib, but I had the towel on hand (obviously shoved in my sewing stash), so I thought I’d use it as a tester :).
2. Place knit right sides together, matching short ends, and stitch in place using a 1/4″ seam allowance.
3. Turn knit right side out and fold in half , matching raw edges.
4. Baste raw edges together.  This will be the collar.
5. Mark middle of collar by folding in half at seam.  Use these marks to evenly pin collar to circle, with the folded edge towards the outer edges of the bib.

6. Stitch collar to towel, keeping your stitch line just outside of your traced circle.
7. Carefully cut away inner circle of towel.  Note: If you have a serger, you can leave a little excess towel seam allowance.  If you do not have a serger, cut the towel seam allowance to match the collar seam allowance.
8. Finish inside collar seam allowance by serging raw edges or using a zig zag stitch.
9. To form sleeves, turn bib front toward bib back, folding at the mid-point of the collar.  Stitch lines approximately 1″ long along side edge on each side of bib back to secure sleeve openings.
10. To form optional pocket, fold bottom edge of front side of bib upward approximately 3-4″.  Stitch in place along edges of bib.  Note: As pictured, you may need to stitch 3/4″ or so in from edge if the fabric along the edge is too thick to stitch through.
Make a few – your kids will love not having a scratchy plastic bib on their necks.
…And you’ll love the bib staying on your little ones :).

SEW RUFFLE DIAPER COVER TUTORIAL

Materials:
1/3 yd ruffle fabric (you can find the pink I used here)
1/4″ elastic – 1  14″ piece
1/2″ elastic – 2  8″ pieces
ball point needle
Click HERE to download and print pattern pieces.
Directions:
1. Print pattern pieces. Ensure your printer is not set to scale the pattern. Cut pattern pieces out along solid and dashed lines and tape together along dashed lines. Normally a diaper cover could be cut on the fold, but since ruffle fabric is a bit trickier to cut out (I’ll give some specific tips below), we’re going to use a full pattern piece that’s not on the fold.
2. Lay pattern pieces on ruffle fabric and cut out as directed, aligning top of pattern pieces just below point where one ruffle is attached (flip that ruffle up and out of the way while cutting). This will give enough width of non-ruffled fabric to use for the waistband casing. 
A couple of other tips to keep in mind when cutting out your pieces:
When cutting the sides and curves of each piece, make sure that the ruffles are always laying flat as they would naturally fall. 
When cutting the bottom of each piece, flip the ruffle nearest the bottom up so it does not get in the way of cutting.
A few tips before we start sewing with ruffle fabric:
* Since ruffle fabric is a knit, always use a ballpoint needle.
* Before pinning and sewing ANY seam, always make sure every ruffle is laying flat and in place. Sewing in the direction that the ruffles are laying will help them to stay put while being sewn (example: sew the side seams from the top of the diaper cover towards the bottom).
* Pin, pin, pin! I can’t say that enough, especially on any curved edges, where it’s more difficult to keep the ruffles in place as their sewn.
* Don’t stretch the fabric as it’s sewn. Allow the feed dogs on your machine to gently guide fabric through.
* Sergers work great with ruffle fabric, but I like to sew the seams with a sewing machine first and serge afterwards to give myself the opportunity to unpick any areas where the ruffles might have gotten out of place when sewn. Do what works best for you :).
* Ruffle fabric raw edges will not fray, so if you don’t have a serger, you can just leave the raw edges after they’re stitched – no need to zigzag.
3. Pin and stitch front and back pieces together at sides and bottom edges, leaving leg holes open and using a 1/2″ seam allowance. The ruffle nearest the waistband should be flipped upwards toward the top of the diaper cover while sewing the side seams (I didn’t do this, but I’ll explain why you should in a later step). When stitching the bottom seam, you may have to decrease your seam allowance to avoid stitching into a row of ruffles – I only had about a 1/4″ seam allowance on the bottom in this case, but use 1/2″ if you can.
Your ruffles should be laying nice and flat (your top ruffle will be facing upward though, right?).
4. Turn top of diaper cover 3/4″-1″ (depending how much fabric you have before the next row of ruffles) to the wrong side and pin in place, with the first row of ruffle flipped upward and out of the way of the pins.
If you had sewn the side seams with the top row flipped upward, you would not see this at the side seams, which makes it more difficult to sew the waistband casing without catching the top row of ruffles:
5. Stitch close to edge of pinned waistband, forming a casing for elastic, and leaving an opening to insert elastic. Pay special attention to keeping ruffles out of the way of the seam.
6. Pin one leg opening 1/2″ toward wrong side of fabric, using plenty of pins to keep ruffles in place.
7. Stitch close to edge of pinned edge, forming a casing for elastic and leaving an opening to insert elastic. It’s tricky to keep the ruffles perfectly in place as you sew around the curves, so chances are you’ll have a few areas of imperfection where the ruffles got caught up. The good news is that once the elastic is in, no one else will know, so don’t worry a whole lot about it (for the record, it pains me to say that).
8. Repeat steps 6-7 with remaining leg opening.
9. Use a safety pin to insert a 8″ piece (you can adjust the length of elastic based on the size of your baby’s thighs – take off a bit for an extra tiny baby, add a bit for a chubby baby, or if you want the cover to fit longer, you may also want to add a bit extra length) of 1/4″ elastic into casing of one leg opening. Overlap elastic ends 1/2″ and sew together using a zig zag stitch. Repeat with other leg opening and stitch opening of each casing closed.
10. Use a safety pin to insert a 14″ piece (again, adjust the length as needed) of 1/2″ elastic into waistband casing. Overlap ends 1/2″ and sew together using a zig zag stitch. Stitch casing opening closed.
Great work! Your diaper cover is ready to be worn on a cute little behind :).